Friday, June 29, 2012

Uncle Sam Gable Boxes


Just a quick post beforeI have to hurry and get ready for work.  I made some little gable boxes using  clear acetate cardstock.  Since, my favorite tape...Scor-Tape, shows through the clear acetate, I decided to use some star brads to hold the box together.


For the tag, I just made a simple paper punch Uncle Sam.  The sentiment was stamped onto a circle, mounted on a scallop circle then adhered to to a glitter clothespin.  I tied a bow to the handles, to keep the box closed and then I attached the clothespin.


Supplies:
Stamps:  Papertrey Ink-Friendship Jar Summer Fillers
Ink:  Memento
Paper:  Martha Stewart, Recollections
Misc:  Paper punches, ribbon, clear acetate, brads, paper shred, candy bars, Scor-Pal, pop up dots, glitter clothes pin, glitter gel pen

Thanks for stopping by,

Thursday, June 28, 2012

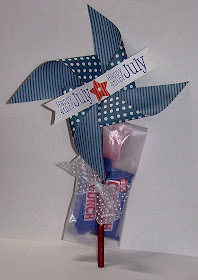
Patriotic Pinwheel Party Pouches


Here are some little party favors I made for the nephews and neices for the 4th of July.  First, I filled some tall and skinny glassine bags with a few small candy bars.

I've really been wanting to buy a pinwheel die, but in an effort to save money, I just used the old fashioned method and did it buy hand.  The pennant banner was also cut by hand with the a stamped sentiment.  The pinwheel was attached to the eraser of pencil with a pin that cut down using wire cutters.  This way, the pinwheel moves!  I attached the pencil pinwheel to the glassine bag with a tiny piece of tape and then finished with a polka dotted bow.


I also made up some favors with clothespins covered in paper and instead of a pin,  I used a star brad.


Supplies:
Stamps:  Papertrey Ink-Friendship Jar Spring Fillers and Hero Arts-CL498
Ink:  Memento
Paper:  Echo Park
Misc:  Glassine bags, clothespins, pencils, candy, pins, star brad, paper punches, Modge Podge

Thanks for stopping by,

Tuesday, June 26, 2012

Etsy Shop Update

I just finished listing some new items in my Etsy Shop.

Some crochet hearts...


 and some blue cotton candy dyed seam binding/wrinkle ribbon....


some of my new clear acetate bingo cards....


some tall and skinny glassine bags.....


my favorite paper lunch sack pouches....


and more.....

Make sure you jump over to my Etsy Shop to check it all out.

I'm still working on getting my bingo card for a digital download, I'm having some problems with the conversion.  I'm going to ask my brother in law for his help, so as soon as it is posted up, I'll let you know.

Thanks for stopping by,

Bingo Cards

I am super excited about this post.  I have been working on this for a while now, and it's finally done!  When I say I, I mean my brother in law, Ted and I!  I have been in love with all of the bingo cards that they different crafters have been using on their cards and scrapbook layouts.  I have combed through the internet looking at everyone I could find, especially one that could be used for a variety of projects.

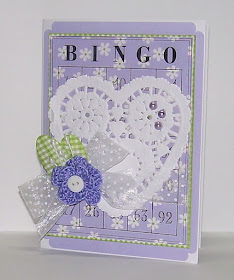
While I was surfing the net, I thought about the Butterflies and Button Cards.  I put clear acetate over the card so I could display re-usable embellishments.  So, after Ted and I made the bingo cards, I put them on clear acetate.  This is great because, you could re-use the embellishments and you can attach them to any pretty cardstock/designer paper to make them match any of your projects.

There are two sizes of the clear acetate bingo cards, the large one is 4 1/2 inches x 3 1/2 inches.  The small one is 2 3/4 inches x 3 3/4 inches. 

Here are two examples of how I used the cards:


For my first card, I used the large acetate bingo card.  I layered it on some pretty Making Memories designer paper.  A heart shaped doily, pearls and some sheer polka dotted ribbon were added.  For the embellishment, I layered two of my crocheted flowers (with a button center), a pearl spray, and some paper punched leaves.


For my little gift bag/tag, I used the smaller the clear acetate bingo card.  It's adhered to some My Mind's Eye Lost and Found designer paper.  I added another doily,  some of my home made button flowers, crocheted heart, crocheted flower and some little sparkly hearts.  The tag is attached to a glassine bag and some dyed seam binding.


Close up of the embellishment:


I am super excited about these, and I have more projects that I am working on to share with you.  I have been busy dying seam binding, crocheting hearts and flowers, cutting out the bingo cards,  and packaging up supplies to make these cute little goodies.  I will be listing them in my Etsy shop this afternoon, so make sure you come back later today if you are interested in purchasing any of these items.

Also, I will have a bingo card download available!  If you would like to print your bingo cards out directly onto paper,  you will be able to that right at home.  The download has 3 (three) pages, each one a little different than the others. 

Don't forget, come back later to check out all of the new goodies in my Etsy shop.

Thanks for stopping by,

Monday, June 18, 2012

Hang Ten, Surfer Dude!


Yes, it is another Father's Day Card!  I know that Father's Day was yesterday and I just finished this one up for brother, Richard.  When he's not master of the financial world, Richard is in Hawaii surfing and sky diving!  My friend, Jean from Dandelion Designs in Hawaii, sent me a great package of some new stamps.  Well, in that awesome gift bag, was this littler surfer dude, and I thought it would be perfect for Richard.  So, I decided to make him a Father's Day card.

I made a stair step card and just fudged it a little bit so the the stairs would be on both sides instead of one just one side.  To make the waves, I used the My Favorite Things Scallop Border Die-Namics and layered them with foam tape.  My little dude was colored with Copics, Diamond Glaze applied to his surf board and the little crab was double stamped (colored and attached with a little foam tape).  I gave the little crab some tiny googly eyes.  Surfer dude is attached a circle of white cardstock that I sponged with both white and blue ink with more foam tape.  Some sand and a sunny sun completed the Hawaiian look.  Richard is a Navy Veteran and an accomplished sailor/boat captain, so I added a paper punch sailboat.  Some alphabet beads where used for the sentiment.  To add my own special flare, and not to disappoint, I added a shark fin!  Not that I wanted him to get attacked, but Jaws is my favorite movie and I did let his daughter, my beautiful niece, Katie, watch all four Jaws movies in a row.  She wasn't afraid, just very impressed that those movies where made using a shark and not computer graphics.  A button and baker's twine completed my card.

Supplies:
Stamps:  Dandelion Designs:  Boy Surfer and Fun In The Sun!!
Ink:  Versafine, Memento, Colorbox
Paper:  Bo Bunny, Bazzill, Recollections
Misc:  My Favorite Things Scallop Border Die-Namic, googly eyes, baker's twine, button, Copics, alphabet beads, foam tape, Diamond Glaze, paper punches

Thanks for stopping by,


Sunday, June 17, 2012

Happy Father's Day!


Yes, I am still working on Father's Day Cards!  This one is for my brother in law, Ted.  Like my Dad, he is a train lover.

Supplies:
Stamps:  My Favorite Things-Wyatt the Conductor, Papertrey Ink:  Postmarks
Ink:  Versafine, Memento, Tim Holtz
Paper:  My Mind's Eye, Bazzill, American Crafts
Misc:  Baker's twine, tag punch, mini clothespin, brads, foam tape, Quickutz  4 x 4 Train Die, date stamper, bingo card

Sorry so quick, but I have to get ready to go to work.  Hope all of the Dads are having a Happy Father's Day!

Thanks for stopping by,

First Class Father's Day Card


Here is the Father's Day Card that I made for my stepfather.  He likes to collect stamps, so I thought the Papertrey Ink Postmarks set would made a perfect card. 

One of my "besties", Victoria, found a typewriter for me at a yard sale for only $5.00!  I've been wanting one for so long, and while there are some on e-Bay and Etsy, the shipping is really expensive.  But, I did find the ribbon on e-Bay and it was very reasonable.  So, I used it for the first time on this card.  It's been along time since I had to type for real, and found myself trying really hard to center my text!  I counted my letters, subtracted, and counted backwards just like my high school typing teacher told me, but still it's not quite centered!  I think it adds a little character and I know that Chuck will love it.

Supplies:
Stamps:  Papertrey Ink-Postmarks
Paper:  October Afternoon, Recollections, Bazzill
Ink:  Tim Holtz, Memento, Versafine
Misc:  Button, baker's twine, paper clip, foam tape, Quickkutz Notebook Sheet 4 x 4 Die, My Favorite Things Stars Die-Namics, sewing machine, typewriter, date stamper

Thanks for stopping by,


Friday, June 15, 2012

Cowboy and Astronaut Tutorial

Here is the tutorial for both the cowboy and the astronaut.  It is mostly a picture tutorial, this way it will give you a hands on look on how I make my paper punch "peeps". 

These are the punches I used and on the right hand side you can see that I used them to start with the astronaut.  I didn't realize until I started typing this out, but you only need to cut one flesh toned word window, for some reason I punched two.


Punch Ingredients:
1 3/4 vellum circle for helmet (omit for cowboy)
1 1/4 flesh circle for head
1 flesh word window for ears
1 1/4 x 2 oval for helmet collar (omit for cowboy)
1 1/4 x 2 tag (cut one for pants and one for shirt)
2 word windows for shirt
2 small flesh flowers for hands
1 narrow strip for belt
2 5/8 black circles for boots
1 small white heart for face
2 small black circles for eyes
1 small flesh circle for nose
black sharpie for mouth
1 brad for cowboy belt buckle
1 photo corner for cowboy's scarf


I had a hard time trying to paper punch a cowboy hat, so I just improvised using the Cricut Paper Doll Dress Up Cartridge to cut the hat.  But, I did see some great ideas when I googled it, but I didn't have the right punches and nothing to improvise.  So, instead of buying more punches, I cheated and used the Cricut!

I hope this helps, if you have any questions, just drop me a line!

Thanks for stopping by,


Thursday, June 14, 2012

Airplane Gift Card Holder

***Editor's Note-I have received a request for a tutorial for yesterday's paper punch cowboy.  I am working on it and will post it as soon as possible, thank you.***


This is a quick card/gift card holder that I made for my Dad for Father's Day.  The airplane was cut using the Quickutz Revolution 4 x 4 airplane die that I bought for $3.00 at the Scrapbook Expo!  The clouds were cut using the My Favorite Things Clouds Die-Namics then, embossed with the Cuttlebug Swirls Embossing Folder.  I added a few buttons to the clouds that were tied with baker's twine to give them a little pop of color.  The sentiment is from Hero Arts.


To make a little gift card holder, I just wrapped some more baker's twine around a tiny white paper bag and added a little red heart button from my stash.  The bag was adhered to the inside of the card, and presto....it's done!

Supplies:
Stamps:  Hero Arts CL 498
Ink:  Memento
Paper:  Recollections, Bella Blvd., Bazzill
Misc:  Buttons, Baker's Twine, Quickutz Airplane Die, My Favorite Things Clouds Die-Namics, foam tape, sewing machine,  Cuttlebug Swirls Embossing Folder

Thanks for stopping by,

Wednesday, June 13, 2012

Cowboys For Dad

This is one of those cards I took apart and re-assembled at least 1,000 times!  I just couldn't get it the way I wanted it to look, so I decided that this was going to be the finished product. 


I started by cutting the letters out with the Varsity Letter Cricut Cartridge.  Then I attached the letters with some "paper hinges" that I made so the card could fold up and be displayed whatever manner Dad should choose.


The cowboys were made using a variety of paper punches.  I had problems trying to figure out how to make the hat, so I just improvised by using the Paper Doll Dress Up Cricut Cartridge to cut the hats.  Jute was used to make the cowboy's lasso.


I punched out some hearts and accented the centers with a brad and adhered them to the "A".

Supplies:
Paper:  October Afternoon-Sasparilla, My Mind's Eye-Kraft Fun, Bazzill
Ink:  Stamps by Judith
Misc:  Cricut Paper Doll Dress up and Varsity Letter Cartridges, brads, paper punches, jute, foam tape, black sharpie pen

Thanks for stopping by,

Monday, June 11, 2012

Make It Monday With Kraft Outlet: Cards For Him

This another card I have made for Dad and I am also entering it in the Make It Monday With Kraft Outlet:  Cards For Him Challenge.  You can find all the details for this challenge and the other entries,  here.


I made an easel card with a camping theme.  Dad loves camping, so I thought this would be perfect for him.  This is a big easel card, the base is 6 inches x 6 inches.  The base of the card is made with kraft cardstock.  The tree was cut using Paper Doll Dress Up Cricut Cartridge.  The tent I made just by cutting a triangle, then I cut up the middle, and folded the sides back.  The moon was cut using a circle paper punch and the star is a Quickutz Cookie Cutter Die.  All of the sentiments are computer generated.


For the bottom piece, I added some baker's twine and a brown button.  The fox is cut from kraft cardstock using the Quickutz Fox 2x2 Die.  The little trees are also a Quickutz Cookie Cutter Die. 


All of pieces have inked edges and where adhered with various pop up dots and foam tape to give my card dimension.

Supplies:
Paper:  Echo Park This and That, Bazzill
Ink:  Tim Holtz, Martha Stewart, Memento, Versacolor
Misc:  Baker's twine, button, foam tape, pop up dots, computer generated sentiments, thin dowel, Quickutz Fox, Quickutz Cookie Cutter Tree and Star, Cricut Paper Doll Dress Up Cartridge

Thanks for stopping by,

Friday, June 8, 2012

Bitty Bags and Tags

Here are a few Bitty Bags and Tags that I made for my friend, Rosie.  She requested some some "summery" colors.  It has been pouring rain all week here in Central Florida.  The grass is green, but the sky is grey.  I'm ready for some sunshine again!


Thanks for stopping by,


Monday, June 4, 2012

I Love You To The Moon Father's Day Card

  
Here is the first card that I've made for my Dad  for Father's Day.  I got this great October Afternoon Rocket Age paper pad at the Scrapbook Expo for only $4.00!  I was very excited because I'd been wanting this particular pad for a while now.

First, I made a little astronaut out of paper punches.  I used the Cuttlebug Red Tag Sale Alphabet to cut the letters out.  I cut each letter out three times and layered them to get a "chipboard" alphabet effect.


For the second panel of my card.  I cut out the planets with the circle Nestabilities.  The rockets are a Quickutz die.  All pieces are layered with some foam tape.  My Dad's cat or as he puts it, "my little brother", is named Buzz, after Buzz Aldrin.  I wanted to add Buzz to the card, so I cut a cat out using a Quickutz Die.  I sponged a little white ink around the "fur" to try and show his white tips on his fur.  Since I used some vellum to make the astronaut's helmet, I thought Buzz needed a helmet, too.  But, it kind of looks like he is wearing a cone, or as we like to say, the cone of shame!  The sentiment is computer generated.

For the final panel of the card, I cut out some stars using a My Favorite Things Die-Namics and some foam tape.  Since, I'm loving using the Papertrey Ink Just The Ticket Die/Stamp set, I used it to "sign" my name.

Supplies:
Stamps:  Papertrey Ink-Just The Ticket
Ink:  Versacolor, Memento
Paper:  October Afternoon, Bazzill
Misc:  Quickutz Rocket and Cat, Nestabilities, paper punches, Papertrey Ink Just The Ticket Die, foam tape, star brad, sharpie pen, My Favorite Things Star Die-Namics, Cuttlebug Red Tag Sale Alphabet Dies

Thanks for stopping by,