Sunday, November 11, 2018

I'm Thankful For You


I made these jars for my Dad and Stepmother.  The church and trees are from the Petite Places line at Papertrey Ink.  I paper punched the pumpkins and the little heart.


I love confetti, sequins, and sprinkles.  I didn't want to go overboard, so I just  put a few into each globe.  Of course, I had to add some candy to each jar.


Supplies:
Stamps:  Papertrey Ink-Fall Friendship Jar Fillers
Ink:  Versafine
Paper:  Echo Park, Bazzill, The Paper Studio
Misc:  Plastic globes, sequins, paper punches, mason jars, Papertrey Ink Petite Places Church & Trees dies, ribbon, Nestabilities, candy

Thanks for stopping by,

Saturday, November 10, 2018

All Treats and No Tricks


These are the last of the Halloween treats that I made.  I can't remember if I've ever made these clothespin witch hats before, but I thought they would go great with these little pails that I have in my stash.


I bought these milk bottles at Michaels, I don't know when!  I filled them up with candy and then added a Impression Obsession die cut to the front.  I cut the witch out with viny.  I made a tag with my Cricut and tied it on to the jar with some pretty organza ribbon.


I'm really pleased that I was able to use up some of my supplies that I've been hoarding all of these years!


Supplies:
Paper:  Papertrey Ink, Recollections, The Paper Studio
Misc:  Milk bottles, Copics, ribbon, paper punches, pop up dots, vinyl, Impression Obsession witch die, mini pails, paper shred, candy, clothespins, Nestabilities

Thanks for stopping by,

Wednesday, November 7, 2018

Batty for Chocolate


Who doesn't love chocolate!?  I'm on the keto diet, but I'll admit I cheated a bit during the Halloween festivities.  

I made these bats for my coworkers.  They were very easy to make and it combined two of my favorite crafting techniques, paper punch art and Cricut.


Supplies:
Paper: Bazzill, The Paper Studio
Misc:  Paper punches, white gel pen, Cricut, Hershey Nuggets

Thanks for stopping by,

Wednesday, October 31, 2018

Happy Halloween!


Happy Halloween!!  I found this great Tim Holtz Thinlits Frightening Faces set and I knew I absolutely needed it.  Then, Joanne's had their pumpkins on sale 70% off, so of course I had to buy a bunch.


With my trusty glue gun, I decorated hats with a variety of flowers, beaded spiders and some fluffy tulle.  I used to the thinlits to cut the faces out of vinyl  This was great because I could re-arrange the faces to make them look especially spooky.


I think this one is my favorite.


Supplies:
Misc:  Pumpkins, tulle, silk flowers, glue gun, beaded spiders, hats, crochet flowers, vinyl, Sizzix Tim Holtz Thinlits Frightening Faces

Thanks for stopping by,

Monday, October 29, 2018

Ghostly Kisses


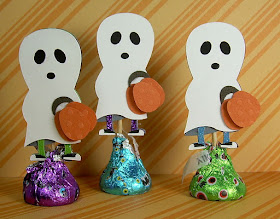
Here are some super cute little ghosts that are perfect favors for your Halloween party or a little sweet treat to add a little fright to your favorite trick or treater's day.


The little ghosts were cut using my Cricut.  I glued a toothpick on the back and slid it into the Hershey Kiss.  The pumpkin trick or treat bucket was made using paper punches.

Supplies:
Paper:  Bazzill, Colorbok, The Paper Company, Recollections
Misc:  Cricut, Hershey Kisses, toothpicks, glue, paper punches, pop up dots

Thanks for stopping by,

Sunday, October 28, 2018

Vampire Test Tubes


I'm on a mission to use up supplies in my stash.  Probably one of the few benefits from being housebound after my surgery, I wasn't able to run out to Hobby Lobby or Michaels!


I did find tiny candy corn at Target, and they fit perfectly in these test tubes.  The vampires where cut using my Cricut and the sentiment is from Papertrey Ink.


Supplies:
Stamps:  Papertrey Ink-Halloween Pin Ups
Ink:  Versafine
Paper:  The Paper Studio, Recollections, Bazzill
Misc:  Nestabilities, pop up dots, Cricut, plastic test tubes, candy corn, Scor-Pal

Thanks for stopping by,

Friday, October 26, 2018

Halloween Pinata


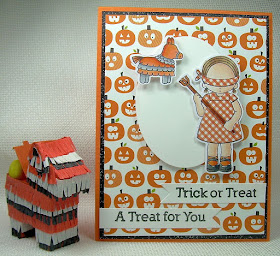
I'm always trying to think of different ways to use my supplies.  I picked up this little pinata die when we went to the Scrapbook Expo last spring and the stamp/die set from my birthday trip to the My Favorite Things Boutique.  


My Pure Innocence image was colored with Copics and paper pieced.  You can't see it, but there is a little bit of Diamond Glaze on her shoes and on her stick.  The card is made with lots of layers and lots of pop up dots.


The little pinata was pretty easy to put together.  This is the second attempt, the first one I used way too much glue on and it was very noticeable as I used black cardstock.  I used crepe paper, for the fringe trim, but I think next time I will use designer paper or cardstock as the crepe paper/glue combination made a mess as well difficult to handle.

It's just big enough to hold a small amount of candy corn, which is perfect for a little gift.

Supplies:
Stamps:  My Favorite Things-PI Birthday Pinata & Spider Web
Ink:  Versafine & Momento
Paper:  Copic X-Press Blending, Bazzill, The Paper Company, Bella Blvd.
Misc:  Crepe paper, tacky glue, candy corn, pop up dots, Nestabilities, Copics, Sizzix Pinata die, Papertrey Ink banner die, Diamond Glaze

Thanks for stopping by,

Wednesday, October 24, 2018

Open If You Dare


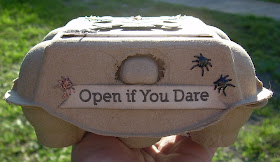
I've been trying to figure out when I bought these egg carts.  I think it's been a few years, but they were next on my list to use.  I thought they would make great treat holders.

The tops were decorated using my Cricut and one of my favorite halloween spider dies.


Lately, I've been having issues with my pictures.  I can't ever seem to get them the way I like them.  So, I'm trying the indoor/outdoor method.  I couldn't decide which ones to post, so I decided to use them both.

Of course, it wouldn't a treat holder unless there were treats on the inside!


 Supplies:
Stamps:  My Favorite Things-Spider Web Stamp
Ink:  Versafine
Paper:  Carta Bella, Bazzill, Recollections
Misc:  Egg cartons, Cricut, candy, paper shred, pop up dots, Diamond Glaze, Memory Box Spider die, Papertrey Ink Banner die


Thanks for stopping by,

Sunday, October 21, 2018

Fall Days are Fun Days


Just another card, this one will hopefully help usher in some cooler air.  It's the end of October and yet it's still in the 90's with a heat index of 100 degrees!  I'm so ready for the cooler weather!!

Supplies:
Stamps:  My Favorite Things Pure Innocence-Caramel Apple
Ink:  Versafine & Momento
Paper:  Echo Park, The Paper Studio, Copic X-Press Blending, Recollections, Bazzill
Misc:  Fence die (unknown manufacturer), pop up dots, Copics, Nestabilities, Diamond Glaze, Papertrey Ink banner die

Thanks for stopping by, 

Friday, October 19, 2018

Side Step the Zombies!

This card was inspired by one I found on Pinterest here.  I found a tutorial to make a large side step card on You Tube, it was very easy, and you can find it here.

The tree was cut with my Cricut.  The ghosts and the tombstones are both 2 X 2 Quickutz Dies.  To add a little pop of color, c couple of paper punched pumpkins where tucked in.


Supplies:
Stamps:  Sugar Pea Designs:  Undying Love
Ink:  Momento
Paper:  Bazzill, Neenah
Misc:  Paper punches, Cricut, pop up dots, Scor-Pal, Copic, Quickutz Ghost & Tombstone Dies

Thanks for stopping by,

Thursday, October 18, 2018

We're Gonna Need A Bigger Cake!


Jaws is one my favorite movies, and I've recently added two new shark themed stamped sets to my hoard!

I decided to make a fun box birthday card.  It is accented with some glittery paper punched balloons and tiny cakes made with my Cricut.


Supplies:
Stamps:  Avery Elle-Hello Chum; The Stamps of Life-Shark Pudgie
Ink:  Momento & Versafine
Paper:  Recollections, Bazzill, The Paper Studio
Misc:  Copics, pop up dots, Nestabilities, Scor-Pal, Stickles, clear acetate, paper punch, glitter pen

Thanks for stopping by,


Wednesday, October 17, 2018

You Are Amazing


Here is another card that I made with my stash from out birthday trip to the My Favorite Things Boutique.  If you are ever in central Florida, you definitely want to take a trip to Eustis to go to the boutique, it's awesome!

As usual, I used lots of layers, different textured papers, and Copics to make my super girl come to life.

Supplies:
Stamps:  My Favorite Things-You're Super
Ink:  Momento & Versafine
Paper:  Copic X-Press, My Favorite Things, Paper Studio, Recollections, Bazzill
Misc:  Copics, pop up dots, Nestabilities, My Favorite Things You're Super Die-namics, Diamond Glaze

Thanks for stopping by,

Tuesday, October 16, 2018

Ghostly Greetings


I can't believe that it's been 2 months since I've posted, I'm truly disappointed in myself.  I have been hard at work crafting.  Last April, I broke my foot, and I just had surgery at the beginning of the month.  I was out for two weeks, and I've made some amazing (I think they are) things and I can't wait to share them with you.

This is my first at making a multiple window shaker card.  I've made a few shaker cards, but nothing this complex.  For my birthday, my Mom and our friend, went to the My Favorite Things Boutique and I bought a lot of goodies.  It was a big birthday, and while I normally love my birthday, this year, I was a little down.  but retail therapy helped.

I didn't have any mounting tape that was thin enough, so I used some black foam that I bought on clearance at Hobby Lobby.  I ran it through my Big Kick (with the die) and then adhered it with some glue.  Easy peasey!  For some reason, my white sequins look pink, but I think it's just the angle of the picture.

Supplies:
Stamps:  My Favorite Things-Fab-BOO-Lous Friends
Ink:  Versafine & Momento
Paper:  Paper Studio, Bazzill, Recollections, Carta Bella
Misc:  Sequins, foam, acetate sheet, Papertrey Ink Collage die,  My Favorite Things Die-Namics, Copics

Thanks for stopping by,

Tuesday, August 14, 2018

Back To School Basket


I made a little gift basket for my sister.  This year she is teaching World History and Costuming.  The tag was made from using one of my new stamps that I picked up at the Scrapbook Expo.  I found the basket at the Dollar Tree and filled it with little goodies to help her day go a little smoother.


Supplies:
Stamps:  Paper Nest-Back to School Ellie
Ink:  Momento
Paper:  Echo Park, Bazzill
Misc:  Letter stickers, basket, pop up dots, black tulle, Copics, Diamond Glaze, basket

Thanks for stopping by, 

Sunday, August 12, 2018

Another Explosion Box & Tutorial


I recently joined the JOANN Loves Papercrafters on Facebook.  I've been in awe of the creations that all of those talented people have, so I decided to be brave and post something I made.  I posted the Baby Exploding Box and I received so many wonderful compliments, it just made my heart full.  I also received requests for the directions, and since I had another one to make for another lady at work, I decided to get to work on it.

First, take a 12 x 12 piece of cardstock and score at 3 1/2 inches on each side.


Then, cut out the corner pieces.


Here comes the fun part, time to decorate and embellish!  One thing that I do that I think gives the box a bit more stability is to make double panels (or layers) of paper on the sides of the box.  Here you can see how I decorated the outside of the box.


Next, flip it over and decorate the inside.  I did the two layers of cardstock and then added some die cut doilies.  Since this is for a baby girl, I wanted to give it a lacey girly look.


Next, I made the lid.  Math is not my strong point, so I tend to do things the hard way.  My Dad is a retired Chemical Engineer, my Brother is CFO/CPA, my Sister is a Teacher, and my Mom can figure anything out!  So the technical gene, skipped me!  So, to make the lid I used a piece of white card stock and scored at 1 1/2 inches on two sides.  Now, if you measure the bottom of the box, you will find that it is 5 inches x 5 inches.  At the 1 1/2 score line, I measured 5 inches plus two little lines on the ruler, and then scored on that line.  Then I measured 1 1/2 inches and cut the paper.  Rotate the paper and do the same thing.  Clear as mud?!  You can also try cutting a piece of cardstock 8 1/8 inches and score it on each side at 1 1/2 inches.  You will want to notch the corners on lid so that it will fit inside with showing.

I decorated the top of the box, but forgot to take a picture of it before I put it all together!


I embellished the inside with some paper flowers, butterflies, and two cute babies I cut using my Cricut.  I put a tiny bit of adhesive on the bottom of the shoes to hold them in place.


I put the lid on the box, tied it with a tulle bow and put it next to my purse to bring to work tomorrow.

Supplies:
Stamps:  Papertrey Ink-Baby Button Bits
Ink:  Versafine
Paper:  Bazzill, The Paper Studio, Recollections, Pebbles
Misc:  Tulle, Scor-pal, paper punches, half pearls, pop up dots, My Favorite Things Oval Doily Die, Mama Elephant Mini Bow Die, baby shoes, Cheery Lynn French Pastry Doily Die

Thanks for stopping by,

Teacher Tissues


Tomorrow is the first day of school here in Orange County.  In the event of a few tears or "achoos", I made this box for Ms. Kelly to put on her desk.


I constructed the box with red cardstock and then added two layer panels with coordinating papers.  My little teachers were made using Create A Friend Cricut Cartridge.  The original cut file has the teacher holding a book, but I substituted it with an apple die cut covered in Diamond Glaze.
I also added a little Diamond Glaze to her shoes.  The pointer is a toothpick that I stained with brown ink.  The chalk board is just kraft cardstock with a layer of black cardstock on the top.  With a little white ink, the sentiment was stamped.


The apple is from one of my favorite Cricut Cartridges, Preserves.  The pencil was made using a variety of paper punches, googly eyes and some glasses brads.  All four sides are decorated, so from any angle you can see the designs.

Supplies:
Stamps:  Papertrey Ink-Petite Places School
Ink:  CTMH, Stamps by Judith, Momento
Paper:  Authentique, Bazzill, The Paper Studio
Misc:  Googly eyes, glasses brads, paper punches, pop dots, Cricut Create A Friend & Preserves Cartridges, tissue box, toothpick, Diamond Glaze, Papertrey Ink Apple Die,  Mama Elephant Mini Bow Die

Thanks for stopping by,