Tuesday, August 31, 2010

Turkey Tins


If you are sick of mini favor tins, please raise your hand. It's really hard to type with only one hand! Just when I thought I had used them all up, I found more. I think they are reproducing all on their own.

You could get a jump start on your Thanksgiving table decorations with these easy tins. What a great way to welcome family and friends to your holiday dinner table.


Supplies:
Paper: Bazzill, The Paper Company, Recollections, Bo Bunny
Stamps: Joann Fabrics-Alphabet
Ink: Versafine
Misc: Mini favor tins, Doodlecharms Cricut cart, crop-a-dile, ribbon, black pen, sticky strip, wood skewer, paper punches, stickles, nestabilities, pop up dots


Thanks for stopping by,

Beth

Monday, August 30, 2010

From the Desk of Butterflies, Take Two


I finally made a box for the cards in this post. I used the My Timeless Template, From the Desk of and just made it a bit larger to accommodate the larger cards. The desk set includes 5 cards and envelopes, a matching journal, and a few pens.


Supplies:
Stamps: My Time Made Easy-Just For You
Paper: Bazzill, DCWV
Ink: Versafine
Misc: Embossing powder, embossing gun, silk leaves, MS paper punches, half pearls, ribbon, nestabilities, pop up dots, diamond glaze, sticky strip


Thanks for stopping by,

Beth

Sunday, August 29, 2010

Pumpkin Tins Tutorial


Here is a quick tutorial for the pumpkin tins. It makes me so happy that people like my stuff. So, thank you so very much!

-Make the belly band out of orange cardstock just like the spider.

-Cut 3 orange ovals using a large oval punch(I used the EK Success 1 1/4 x 2)

-Using a 1/2 inch circle punch, cut 2 white circles and 1 orange circle. Cut the orange circle in half and glue the halves onto the white circles to make the eye lids.

-Using a 3/4 circle punch, cut 1 black circle. To make the mouth, cut the circle in half and using your scissors, cut the teeth. I basically cut it free hand, though I practiced until I got the look I wanted. The nose is just a free hand triangle that I cut.

-Cut two black centers for the eyes. I used my Crop-A-Dile.

-The stem is cut free hand from brown cardstock.

-Assemble the pumpkin. I used pop up dots on the top oval. The eyes are attached with pop up dots. Glue the centers of the eyes on, the nose, and the mouth using a two way glue pen. I used snail to put the stem on. Attach the pumpkin to the belly band.

-Using orange Stickles, outline the pumpkin ovals and fill in the eye lids.

-Using black Stickles, fill in the mouth, nose and black eye centers.

-Attach a bow or little leaves and you are done!

If you have any questions, feel free to contact me. Also, if you make some of these or the spiders, please send me a picture or a link. I would love to see them!

Thanks for stopping by,

Beth

Friday, August 27, 2010

Pumpkin Tins


Here is the pumpkin version of the of the mini favor tin. I am still trying to use them all up! They are made using paper punches. I added stickles to their faces and to outline the ovals.


Supplies:
Paper: Bazzill
Misc: Mini favor tins, stickles, paper punches, ribbon, paper shred, plastic treat bag, tacky glue, pop up dots, crop-a-dile


This is the card that Jenny and my Mom made me. I had given them a bag of old embellishments that I had made. I figured that they would make cards with them. So, they did, they made me a birthday card!


Thanks for stopping by,

Beth

Thursday, August 26, 2010

Spider Tins Tutorial


Thank you so much for all of your kind words and compliments on my little spiders! Here is a quick tutorial.

-To make the belly band. Cut a strip of cardstock that 3/4 inch wide. Wrap it around the tin and crease it lightly. Then score on those lines. Just trim the strip to so it overlaps slightly. You want the belly band to hold the tin together, but not too tight so that you can't slide the spider off. Glue the the edges together.

-Cut 2 pieces of card stock 1 3/4 inches x 5 1/2 inches for the legs. Score each piece at 1/2 inch, 1 5/8 inches, 3 7/8 inches, 5 inches. Cut little triangles on the ends of the legs to make the feet. Criss cross the legs and glue them on to the belly band.

-The body is cut using the 2 1/2 inch scallop circle Nestabilities.

-The head is a cut using a 1 1/2 inch punch.

-The eyes are cut using a 5/8 punch. Cut 2 white and 1 black, cut the black one in half for the eye lids. I used the Crop-A-Dile to cut the little black circles in the eyes.

-Glue the body on top of the legs. The head and eyes are attached with pop up dots. Add a bow, and you are done!

I used a tacky glue on the spider as opposed to snail adhesive because I found it holds the glitter cardstock together better.

Hope this is helpful, if you have any questions, just let me know.

Thanks for stopping by,

Beth

Wednesday, August 25, 2010

Spider Tins


I'm still trying to use up all of my little favor tins. I love all of the little peppermint patty spiders that are on Splitcoast. I decided to incorporate that idea and use the tins at the same time. This is what I came up with.

The spiders are attached to a belly band to hold the tin together. The spider just slides on and off the tin. I used glitter cardstock to give the spider a spooky feel. You can fill the tin with whatever goodies you want. I noticed that they had candy corn at Joann Fabrics the other day! The sentiment is computer generated.


Supplies:
Paper: Bazzill, Color Bok, The Paper Company
Misc: Mini favor tins, paper punches, pop up dots, tacky glue, nestabilities, ribbon, plastic bag, candy corn, crop-a-dile


Thanks for stopping by,

Beth

Tuesday, August 24, 2010

What A Girl Wants Desk Set


It feels like it's been forever since my last post. Last Friday was my birthday. I had a great day. Thursday night, at work, on my regular guests came in and gave $50.00 for my birthday! I couldn't believe it! I took Friday off, and my mom, stepfather, and Jenny came. We went out to lunch and then to Violette's. I spent my birthday money at Violette's. She had just got in a new shipment of Justrite Stamps, and I was psyched. I need more Christmas and Snowmen stamps like I needed a hole in my head, but I had to have them! Mom and Jenny made me card. I was cleaning out my supplies one day, and had a whole bunch of embellishments that I had made that I gave to them. I figured they could make some quick and easy cards. Well, they did, they stuck them to a piece of cardstock! It's a funny and crazy card. I will post a picture of the card this week. My friend, Victoria, and her 3 year old son made me cupcakes and he sang on the phone to me. It was so sweet. Dad sent some movies, and some cat treats for my fur babies. It was a good day.

Now, onto my project. I've been looking everywhere for a desk organizer box that would fit the larger cards. I love the template, From The Desk Of, by Lauren Meader. But, it only fits the smaller A6 cards. Then I had a "moron, your bus is leaving moment" (Bill Murray-Groundhog Day), and I just made it a little bigger and it worked! The desk organizer has a set of 5 cards and envelopes. I made a little journal with my Bind-It-All and added a few pens. The flower on the front is one that I crocheted and quickly attached it before Tedy could lose it. The directions for the flower can be found on Nichole Heady's blog. I made the little pearl embellishments on the front of the bows.


Supplies:
Stamps: My Favorite Things-What A Girl Wants
Ink: Memento, Versafine, Tim Holtz
Paper: Bazzill, Graphic 34
Template: My Timeless Templates-From The Desk Of
Misc: Half pearls, ribbon, bind-it-all pop up dots, diamond glaze, copics, chipboard coasters, pens, dmc floss, silk leaves


Thanks for stopping by,

Beth

Wednesday, August 18, 2010

#1 Teacher Notepads

(EDITOR UPDATE:  FOR THE TUTORIAL TO MAKE THESE NOTEPADS, CHECK OUT NICHOLE HEADY'S BLOG HERE.)
 
Here some quick notepads to make for your favorite teachers. The sentiment is computer generated.

Supplies:
Stamps: My Favorite Things-Emma and Her Backpack
Ink: Versafine, Memento
Paper: Making Memories, Adorn It, Scenic Route
Misc: Sticky strip, pencils, rick rack, diamond glaze,nestabilities, notepads, half pearls, green sharpie pen, pop up dots

Thanks for stopping by,

Tuesday, August 17, 2010

Emma and Her Backpack


Here is another back to school project. I made it for my sister so she could pass out some treats to her fellow teachers this week. She went back to work, but the kiddos don't go back until Monday.

The pail held the little round favor tins that Wilton makes. I didn't throw it out, I knew I would eventually use it! The stamp set is a new set from My Favorite Things, called Emma and Her Backpack. Her skirt is paper pieced and Diamond Glaze was applied to her shoes. Inside the bucket are little Ghiardelli Squares that I wrapped with school themed paper and then added an apple from the Cricut Preserves Cartridge. I added a touch of Diamond Glaze to the seeds of the apples. I believe there are 12 candies in the bucket, I already gave it to her!


Supplies:
Stamps: My Favorite Things-Emma and Her Backpack
Ink: CTMH, Memento
Paper: Bazzill, Recollections, unknown designer paper (I've had it forever!)
Misc: Clear bucket, paper shred, half pearls, white gel pen, buttons, dmc floss, diamond glaze, copics, paper punch, pop up dots, nestabilities, clear acetate, sticky strip, crimper, ribbon


Only 3 more days to my birthday and I'm getting very excited! Today, in the mail, a package and a card came from my Dad. I told him I wouldn't open it until my birthday, but I did shake it! The cats came running when I shook it, I bet there is something in the box for them. He always sends them something. He is a very thoughtful Grandpa to his furry grandchildren. One Christmas, he sent this really heavy box. I couldn't guess at all what it was, but when we opened it, it was full of cans of canned cat food each individually wrapped with their names on it! I got a card (and a Target gift card, my favorite). The shipping was more than the price of all of the food.

Thanks for stopping by,

Beth

Monday, August 16, 2010

Apples For The Teachers


Sorry this post is so late. My sister, Laura, my nephew Joe, and Jenny, of course, came today to trade tvs. My other nephew, Dave, is moving into the dorm on Friday and he is taking my small tv on my craft table and Laura traded this ginormous tv she had in her living room. It's huge! Then we went out to dinner to celebrate my birthday, which is also on Friday! Yay!! Cake and presents, I'm so excited! Granted, I've already received some presents. My friend, Tressie, took me to see Bad Company in concert, we were 10 rows back from the stage. It was so awesome! My other friends, Tony and Heather, bought me a New England Patriots Garden Gnome. He's so cute. I don't have a garden, he looks really good in between my Wally the Green Monster Bobblehead Doll and my Boston Red Sox candy dish. I love birthday cake. I bought the stuff tonight to make my cake. Mom, Jenny, and my stepfather, Chuck are coming on Friday. I hope we get to go to Violette's Scrapbook Store. Hint, Hint, Hint. For those of you that read the comments, Mim in Fl. is my mom. She commented how the notepads would make a nice gift. What she didn't comment on was that for Mother's Day, she got a package of the notepads and I printed out the pattern for her to make the notepads.

Onto the project, these are great little gifts to send with your kids for the first day of school. The apple is from the Preserves Cricut Cartridge. I applied Diamond Glaze on the apple seeds to give them a little dimension. The triangle box is a stamp from Art Gone Wild. The sentiment is from Dandelion Designs. There is a little candy bar in the box. If you don't want to send candy, you could put a little message or some tiny school supplies inside.


Supplies:
Stamps: Dandelion Designs-For My Teacher, Art Gone Wild-Triangle Box
Ink: Versafine
Paper: Bazzill, The Paper Company
Misc: Cricut, Preserves Cartridge, pop up dots, crop-a-dile, nestabilities, ribbon, diamond glaze, clear treat bag, candy


Thanks for stopping by,

Beth

Friday, August 13, 2010

Halloween Candy Holders


This is the halloween version of the candy holders I made using the little round favor tins. You can see my easter post here.


This is the inside view.

Supplies:
Stamps: Savvy Stamps-Spooky Halloween
Ink: Memento
Paper: Recollections, Debbie Mumm, DCWV
Misc: Round Tins, Cricut, PDDU Cricut Cartridge, ribbon, candy corn, paper punches, pop up dots


Thanks for stopping by,

Beth

Thursday, August 12, 2010

Another Halloween In The Bag!


This is a super easy and quick Halloween project you can make for all of the trick-or-treaters on your list! It is easy enough for the kids to do as well. Just use a variety of paper punches to make the eyes and pumpkin mouths then just glue them onto the little bags. I used circle punches, leaf punches, and oval punches. Stamp the sentiment on the tag, glue a bow on it, and attatch it to the little bag with a paper clip and viola, your done! Don't forget the candy.

Supplies:
Stamps: Rubber Cottage-Halloween Bag
Ink: Stampin Up
Paper: Recollections
Misc: Tags, ribbon, mini paper bags, paper clips, paper punches


Thanks for stopping by,

Beth

Wednesday, August 11, 2010

Holiday Button Bits Tags


Here are some quick and easy tags to get you started on your holiday gift giving. The tags were cut out with the Cricut. I used the Santa stamp from the Papertrey Ink set, Holiday Button Bits.


Supplies:
Stamps: Papertrey Ink-Holiday Button Bits, Inky Antics-To/From
Ink: Memento
Paper: Could 9, Recollections
Misc: Cricut, half pearls, crop-a-dile, copics, buttons, white gel pen, paper punch, ribbon, pop up dots, nestabili
ties


Thanks for stopping by,

Beth

Monday, August 9, 2010

Little Lizzie Note Pads


I saw these little note pad covers on Nichole Heady's Blog, Capture the Moment. I have spent way too much money on her sets at Papertrey Ink. I know that I'm not the only one, though. When I decided to make the note pads, I thought the Little Lizzie combined with October Afternoon paper would look cute.

You can download the pattern for the note pad cover and the pencil cozy here on Nichole's blog. She even provides a great way to jazz up a pencil by using modge podge and designer paper. A little hint, only put the modge podge on the pencil, not on top of the paper like I did! I thought it would look really cool if the pencil was shiny. But, it stuck to the clothespins! So, I had a pretty shiny pencil that had three clothes pins sticking out. I had to throw them out and start over again!


Supplies:
Stamps: Lizzie Anne Designs-Little Lizzie
Ink: Versafine, Memento
Paper: October Afternoon, Bazzill, Bo Bunny
Misc: Paper punches, buttons, dmc floss, pencils, modge podge, copics, note pads, pop up dots, sticky strip


Thanks for stopping by,

Beth

Thursday, August 5, 2010

Baby Booties


The Coluzzle was probably one of the first paper crafting tools I bought. One of my favorite templates is the baby booties. They are really fun and easy to make. I usually put candy in them, but this time, this time I decided to try paper flowers.


Supplies:
Paper: Recollections
Misc: Cropadile, eyelets, ribbon, silk leaves, styrofoam, coluzzle, pop up dots, embossing folder, paper doilies, floral tape,paper punch


Thanks for stopping by,

Beth

Tuesday, August 3, 2010

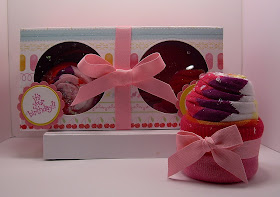
Happy Birthday, Jenny!


Today is my niece/bff's 13th birthday! We are going to celebrate it next week, when one of her cousins comes down to visit, by going to the zoo. Jenny loves the funky socks and cupcakes, so of course, I had to make some more sock cupcakes! The long knee socks that were used produced bigger cupcake then the baby ones, so it was a little tight in the Shutterfly box. So, I decided to try and make a double cupcake box.

Supplies:
Stamps: Dandelion Designs
Ink: Memento
Paper: Bazzill, DCWV
Supplies: Nestabilities, clear acetate, pop up dots, scor-pal, paper punches,ribbon, socks, chunky glitter


Jenny and Grandpa at Fantasy of Flight.


Thanks for stopping by,

Beth