Showing posts with label Hero Arts. Show all posts

Tuesday, March 28, 2023

You Were Born to Fly


I love lots of things, including airplanes.  This is something I share with the world's greatest Dad, my Dad.    I used a combination of paper piecing and Copics for this card.

Supplies:
Stamps:  Hero Arts- CM324
Paper:  The Paper Cut, Echo Park
Ink:  Versafine & Momento
Misc:  Pop Up Dots

Thank you for stopping by,


Wednesday, July 4, 2018

4th of July Gable Boxes


I made these little boxes for my co-workers to celebrate my favorite holiday. 


The box was made from a My Momenta die that I picked up at Hobby Lobby.  Uncle Sam was made using a variety of punches and was adhered to the box with pop up dots.  The tag was made using one of Papertrey Ink Fillable Frames and sentiment from Hero Arts.

Inside the box is a little red and blue paper shred and some candies to help them get through the day.


Supplies:
Stamps:  Hero Arts-Sentiment
Ink:  Versafine
Paper:  The Paper Studio, Bazzill, Authentique, Recollections, American Crafts
Misc:  Gable box die, paper punches, pink chalk, white gel pen, fine line Sharpie pen, pop up dots, paper shred, candies, Papertrey Ink Fillable Frames Die #5

Hope you had a safe and Happy 4th of July!

Thanks for stopping by,


Friday, June 1, 2018

The Simple Joys of Butterflies


This is my second attempt at the Z-Fold card.  My Mom recently purchased a Big Shot and has been cutting out butterflies.  I haven't used my butterfly paper punches in awhile, so her butterflies have inspired me to make some of my own.  


Supplies:
Stamps:  Hero Arts-Time to Enjoy
Ink:  Versafine
Paper:  The Paper Studio, Echo Park
Misc:  Paper punches, Scor-Pal, Scor-Tape, Impression Obsession Clouds Die, Quickutz Sun Die, pop up dots, clear acetate

Thanks for stopping by,

Thursday, May 1, 2014

Quick...the sun is out, take the picture..


I made this card for my Mom last week, but the weather has been so dreary that the pictures didn't come out right.  It's still a little dark, but I think it's okay.

Supplies:
Stamps:  Hero Arts-CL498
Ink:  Versafine
Paper:  Recollections, Bazzill, Simple Stories
Misc:  Ribbon, buttons thread, Quickutz Doily Die, Sizzix Leaves Die, Papertrey Ink Flower Dies, pop up dots

Thanks for stopping by,

Thursday, April 24, 2014

A Happy Mother's Day with Graphic 45


Good Morning!  I hope this post finds everyone well.  I've been absent from my blog as of late, I have started a new job that I am pretty excited about!  Finally, a full time position with benefits.  My body is still getting used to my new schedule, so I haven't had a lot of energy for crafty time, but slowly I'm getting into the swing of things!

Here is a Mother's Day card that made last night while watching the Red Sox play, it was a great game.

Supplies:
Stamps:  Hero Arts-CL498
Paper:  Graphic 45, Recollections, October Afternoon, Bazzill
Misc:  Buttons, paper punches, thin wire, Martha Stewart Doily, Nestabilities, Papertrey Ink Flower Fusion #1 Die, Papertrey Ink Polka Dot Parade #2 Die, My Favorite Things Scallop Border Die-Namics

Thanks for stopping by,

Monday, June 17, 2013

Sprinkles Just Make Life Better

 
This is the card I made for my step-father for Father's Day.  We both LOVE donuts, and I have had this stamp set for awhile (and never used it), so I thought it would be perfect for his card.
 
I stamped, colored, and cut the donuts out.  I applied Espresso Dimensional Pearls for the frosting.  Now, I didn't have any beads or glitter for the sprinkles, so I cheated and punched some teeny tiny holes out of cardstock.  I had a lot of help with this card, and Oscar is covered in teeny tiny little dots from the cardstock because he felt the need to roll in them every time I punched them out.  I stuck them to the Espresso Dimensional Pearls, but it just didn't look shiny enough for a chocolate frosted donut.  So, I added a layer of Diamond Glaze to the top and I think it looks really good. 
 
The coffee cup stamp that comes with this set, is really cute, but chuck is not a double shot orange mochaccino with whip kind of guy.  So, I improvised with making a to-go style coffee cup.  Every thing is adhered with differing layers of pop up dots.
 
I added some letter stickers and a Whoo Hoo label to finish it off.  I really have a hankering for Dunkin Donuts right now, but, its thundering/lightening something wicked out there and it's Game 3 of the Stanley Cup, so I will forgo my donut to cheer my boys on.  Go Bruins!
 
Supplies:
Stamps:  Taylored Expressions-Sprinkled with Love, Hero Arts-CL498
Ink:  Versafine, Memento
Paper:  MME, Bazzill, October Afternoon
Misc:  Scor-Pal, Scor-Tape, Diamond Glaze, pop up dots, tiny hole puncher, Sn@p stickers, Espresso Dimensional Pearls
 
Thanks for stopping by,


Wednesday, June 12, 2013

Happy Father's Day!

 
Where have I been?!  Work, sleep, work, sleep = NO FUN!!!!  I'm so behind on my crafting, every one's card is going to be late!  It's a little depressing, but hopefully I will have a normal schedule again, soon.  I need the teacher fairy to come and leave me a job under my pillow!
 
So, here is a card I made for my dear old Dad.  I cut the star using my Cricut.  The letters were made using the Papertrey Ink alphabet dies.  I cut the first layer with my designer paper, and then cut two additional layers out of some scraps of old coasters.  They are all glued together and some dimensional glaze was added to give them a little more "pop".  There is also some cat hair in them as well because someone decided that it was put their butt in my face while I'm crafting time again!  I did the "scotch tape masking" to stamp the sentiments "Happy" and "Day" on some little flags.
 
Supplies:
Stamps:  Hero Arts-CL 498
Paper:  Bazzill, My Mind's Eye
Misc:  Cricut, alphabet die, diamond glaze, pop up dots
 
Thanks for stopping by,


Monday, January 28, 2013

Yay, More Valentines!

 
Here are two more Valentine's that I finished.  I decided to make a "tall" card, it's always good to try something different.  The designer paper (underneath the hearts) is actually from a Christmas Bo Bunny pad that I had!  It really didn't look "Christmasy", so I think it worked out just fine.
 
The hearts were cut using Nestabilities and I just adhered scraps of the dp underneath the heart "holes".
 
Supplies:
Stamps:  Hero Arts-CL498
Paper:  Bazzill,  DCWV, Bo Bunny
Ink:  Versafine
Misc:  Buttons, Heart Nestabilities, red Sharpie pen
 
Thanks for stopping by,

Thursday, December 13, 2012

Warm Wishes

 
I cut some skates out with my Cricut Winter Woodlands Cartridge and decided to make a winter card with them.  Since  the skates are kind of fat, with the pompoms and baker's twine, I thought a bag would be a better way to give the card.  I also made a matching tag.

 
Here is a close up of the tag:
 

Supplies:
Stamps:  Hero Arts-Warm Winter Wishes To You
Paper:  Authentique, Bazzill
Ink:  Versafine
Misc:  Clothespin, pop up dots, baker's twine, pompoms, pearls, snowflake paper punch, paper sack, button, black sharpie, Nestabilities
 
Thanks for stopping by,

Friday, December 7, 2012

"My Type" Christmas Cards

 
These were really easy and fast cards that I whipped up.  I cased them from a very talented stamper when I was surfing on the internet.  Unfortunately, I can't find her post, so I can't give her the credit!
 
I did change a few little things.  She had used the Martha Stewart Bow Paper Punch, since I don't have that one, I just substituted a little ribbon bow.  Her sentiment was more of a "typed" sentiment, again I didn't have that stamp, so I just substituted a Papertrey Ink stamp.
 
Supplies:
Stamps:  Hero Arts-My Type and Papertrey Ink-Friendship Jar Holiday Fillers
Ink:  Versafine, Memento
Paper:   Bazzill
Misc:  Ribbon, Martha Stewart Fir Paper Punch
 
Thanks for stopping by,

Friday, November 23, 2012

Christmas Cards and Snowflakes

Happy day after Thanksgiving!  I hope everyone had a nice holiday.  I actually got to go to my Mom's house yesterday.  My work schedule has prohibited me from seeing my family the last few years, but this year I got to go, so bonus for me!
 
My move and job transfer has been a difficult one.  Unfortunately, as with many Americans, I've been having financial and medical struggles.  I had to get a part time job to help cover my expenses.  I'm trying to get as much crafty time as I can, and have been making Christmas cards to sell in my Etsy shop. 
 
Here is the first set I've made.


This is actually a set of four (4) card with envelopes.    I don't have time to list them in the shop at this moment, as I have to hurry and get ready to go to one of my jobs!
 
Supplies:
Stamps:  Papertrey Ink-Holiday Button Bits, Hero Arts-CL498
Ink:  Memento
Paper:  Bo Bunny, Recollections
Misc:  Baker's twine, paper punches
 
While I was at my Mom's yesterday, I told her I needed an easy crocheted snowflake pattern.  She, of course, had the brilliant idea of whipping some off with the embroidery machine.  Well, you will never guess what she did!  After we downloaded a pattern, made one, she offered to let me borrow one her machines to make some at home!  Can you even believe it!!  I was so excited.  So, this morning, I made a whole bunch of snowflakes.  One of the great things about this machine is you can do something else while it's running!
 
Here is the machine:


Here are the snowflakes I made this morning.  I still need to clip some threads.  I can't wait to make up some cards, tags, and gift bags with these!


Thanks for stopping by,


Tuesday, August 14, 2012

Back To School Gift Bags


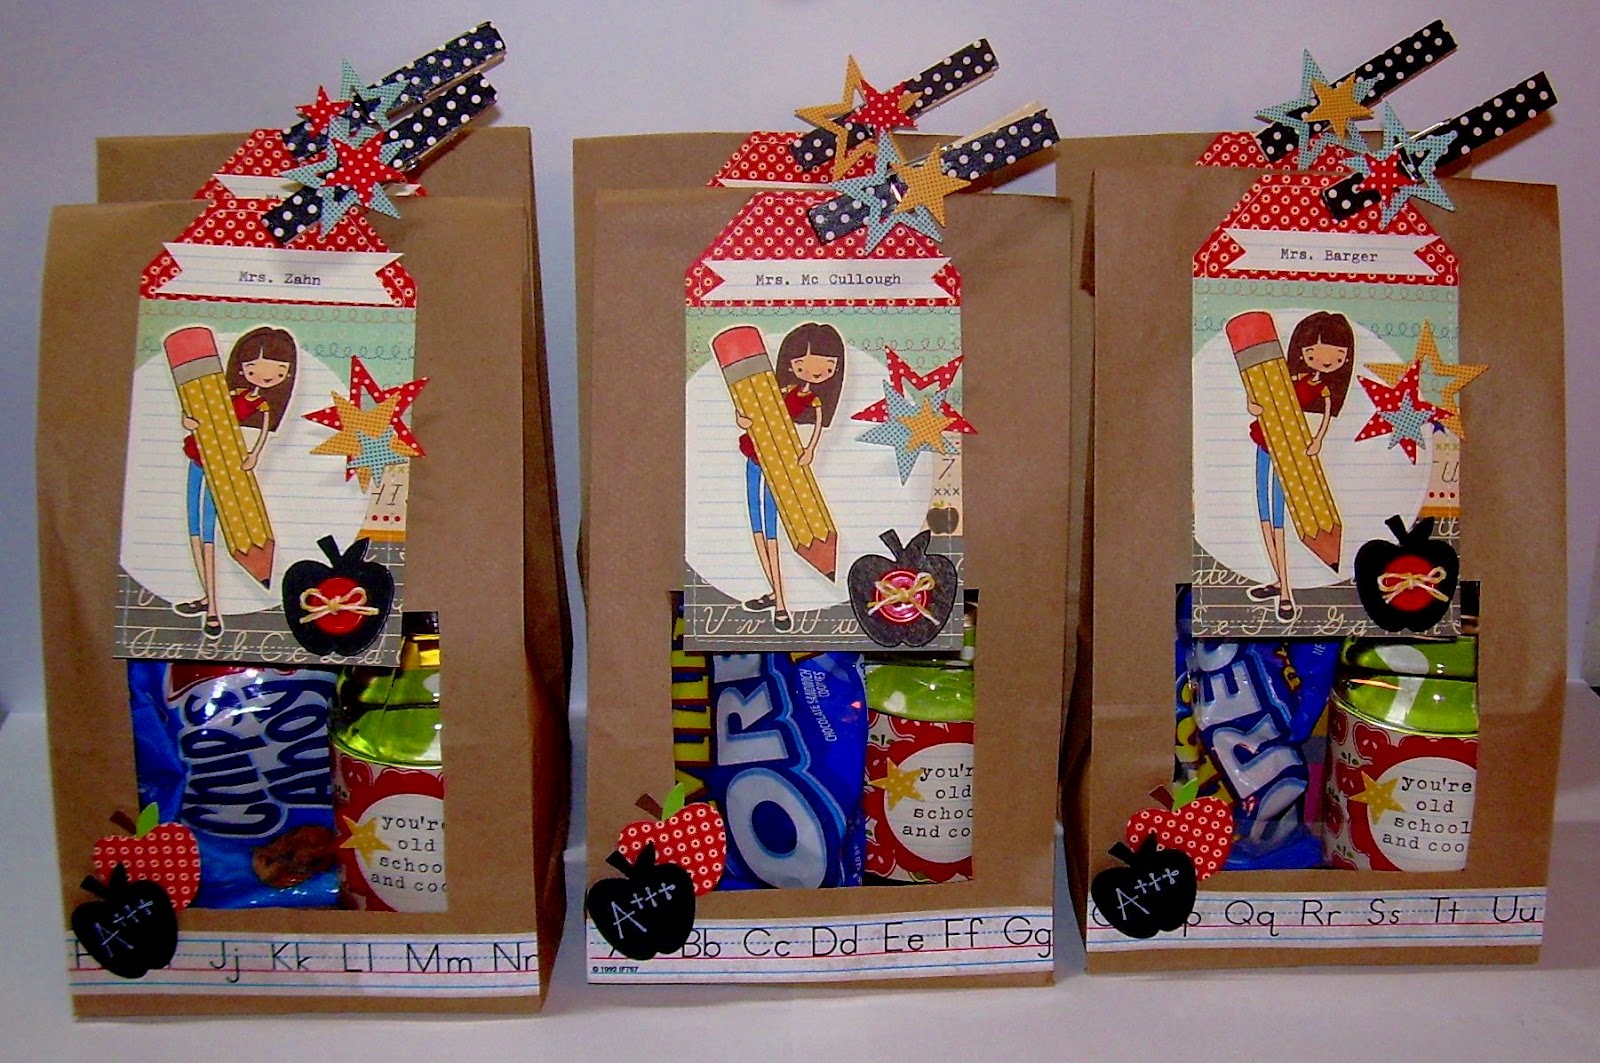
I made some gift bags to match the tags that I made to welcome the teachers back to school.  I just used some lunch sacks.  A square was cut out of the bag and clear acetate was adhered to the inside.  I found this "desk tape" at the teacher store and I adhered it to the bottom of the the bag.  The apples were cut using a Papertrey Ink Die.  One was cut out of chalkboard paper then stamped with white ink with a sentiment from the Lizzie Anne Designs School Days stamp set.


I filled the bag with one of my pencil notepads, a little bag of cookies, and a decorated water bottle.


The water looks green, but it's just the other side of the designer paper.  The sentiment is from the Hero Arts My Type stamp set.


The bag is held closed with a clothespin that I decorated with washi tape and a few more stars.

Supplies:
Stamps:  My Favorite Things-Talk Nerdy To Me, Hero Arts-Just My Type, Lizzie Anne Designs-School Days
Paper:  October Afternoon, Recollections, Bazzill
Ink:  Memento, CTMH
Misc:  Lunch sack, desk tape, buttons, baker's twine, pop up dots, clothespin, My Favorite Things Stars Die-Namics, Papertrey Ink Apple Die, paper punches, water bottle, clear acetate, cookies, notepad, sewing machine, typewriter

Thanks for stopping by,


Friday, July 6, 2012

This Pop Rocks!


This is my first attempt at a "pull up"  card.  It's a really big card, almost 10 inches tall and 5 inches wide.  Embarrassingly enough, it's a Father's Day card!  In my defense, I've been super busy with work, trying to find a new apartment, also I wanted to use a specific paper from my local scrapbook store, and I didn't have the opportunity to get over there!  My parents would say that they prefer to receive gifts later, as it stretches their special day out!

So, to make the card, I just cut out the popcorn box front and back free hand.  I used a little Scor-Tape to adhere the front and back together to make the little pocket.    I cut some strips of the red polka dotted paper and adhered them to front of my popcorn box.  The sentiment was computer generated and cut out using Nestabilities.


For the card, I cut a strip of card stock and stamped my sentiment onto it.  This would also make a great birthday card, just by changing the stamp.


To make the popcorn, I found this great tutorial here.  I love her card!  I had already sketched my card out and knew how I wanted it to look.  When I went blog surfing to find a good way to make the popcorn, I found Kathy's gorgeous card.


The ipod was made using a variety of paper punches.

Supplies:
Stamps:  Hero Arts-CL489, A Muse-You Rock!
Ink:  Memento, Tim Holtz
Paper:  Cosmo Cricket, The Paper Company
Misc:  Tulip Puff Paint, paper punches, embossing gun, Nestabilities, pop up dots, Scor-Tape

Thanks for stopping by,

Wednesday, July 4, 2012

Happy 4th of July!


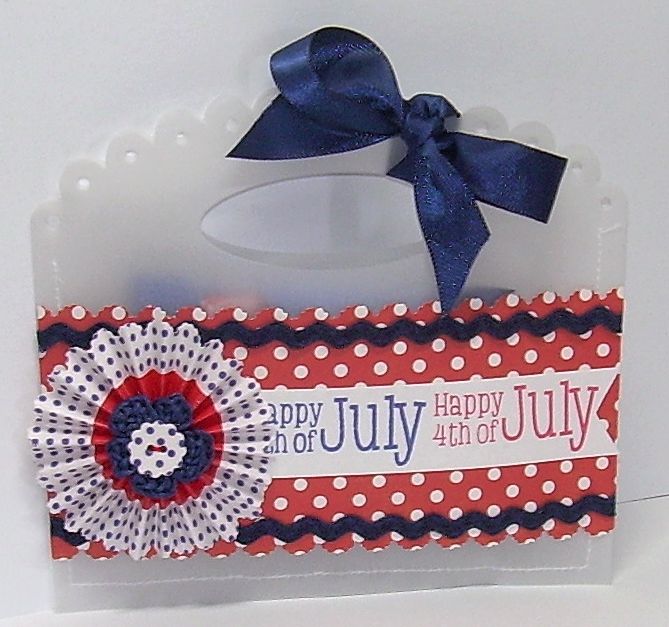
Happy 4th of July!!!!!  This is one of my favorite holidays, I'm just so proud to live in this great country.  Unfortunately, I have to work tonight, boo hoo!  So, I decided to make this little gifty bag for one of my friends who also has to work today.

I used the Papertrey Ink Front & Center #1 Die to make the little bag.  I cut it with some vellum, and then cut the bottom half off.  Using the sewing machine, I just stitched the sides and bottom.  I made the little pinwheel using a border punch, some Target Washi Tape, and my handy dandy Scor-Pal.  A little ribbon, a crocheted flower, some ric rak, scraps from my stash and badda bing, it's done!

Supplies:
Stamps:  Hero Arts CL 498
Ink:  Memento
Paper:  Echo Park, Wasau, Recollections
Misc:  Washi Tape, Scor-Pal, crocheted flower, Papertrey Ink Front & Center #1 Die, border punch, pearl cotton,  sewing machine, ribbon

Thanks for stopping by,

Thursday, June 28, 2012

Patriotic Pinwheel Party Pouches


Here are some little party favors I made for the nephews and neices for the 4th of July.  First, I filled some tall and skinny glassine bags with a few small candy bars.

I've really been wanting to buy a pinwheel die, but in an effort to save money, I just used the old fashioned method and did it buy hand.  The pennant banner was also cut by hand with the a stamped sentiment.  The pinwheel was attached to the eraser of pencil with a pin that cut down using wire cutters.  This way, the pinwheel moves!  I attached the pencil pinwheel to the glassine bag with a tiny piece of tape and then finished with a polka dotted bow.


I also made up some favors with clothespins covered in paper and instead of a pin,  I used a star brad.


Supplies:
Stamps:  Papertrey Ink-Friendship Jar Spring Fillers and Hero Arts-CL498
Ink:  Memento
Paper:  Echo Park
Misc:  Glassine bags, clothespins, pencils, candy, pins, star brad, paper punches, Modge Podge

Thanks for stopping by,

Thursday, June 14, 2012

Airplane Gift Card Holder

***Editor's Note-I have received a request for a tutorial for yesterday's paper punch cowboy.  I am working on it and will post it as soon as possible, thank you.***


This is a quick card/gift card holder that I made for my Dad for Father's Day.  The airplane was cut using the Quickutz Revolution 4 x 4 airplane die that I bought for $3.00 at the Scrapbook Expo!  The clouds were cut using the My Favorite Things Clouds Die-Namics then, embossed with the Cuttlebug Swirls Embossing Folder.  I added a few buttons to the clouds that were tied with baker's twine to give them a little pop of color.  The sentiment is from Hero Arts.


To make a little gift card holder, I just wrapped some more baker's twine around a tiny white paper bag and added a little red heart button from my stash.  The bag was adhered to the inside of the card, and presto....it's done!

Supplies:
Stamps:  Hero Arts CL 498
Ink:  Memento
Paper:  Recollections, Bella Blvd., Bazzill
Misc:  Buttons, Baker's Twine, Quickutz Airplane Die, My Favorite Things Clouds Die-Namics, foam tape, sewing machine,  Cuttlebug Swirls Embossing Folder

Thanks for stopping by,

Monday, February 20, 2012

Hugs & Kisses


I realized that I forgot to post this Valentine last week.  But, I think that this card could be used for any occasion for that special someone.

I used the Hero Arts, My Type stamp set to stamp the typewriter.  Then, I used the Papertrey Ink stamp set, Limitless Labels to stamp the sentiment and the hearts.  You can't see in the photo, but I added a little diamond glaze to the hearts.

Supplies:
Stamps:  Papertrey Ink-Limitless Labels and Hero Arts-My Type
Ink:  Versafine, Memento
Paper:  Bo Bunny, Wasau, unknown black polka dot paper
Misc:  Doily, heart brads, Diamond Glaze, pop up dots

Thanks for stopping by,


Saturday, January 14, 2012

Simple Things Gift Bag Set


Here is a little gift bag/card set that can be used for any occassion.  I used the Papertrey Ink Front & Center #1 Die to make the bag front and back.  This die is awesome!  You just cut a front and back and then sandwich a lunch sack in the middle and presto!  you have a little gift bag. I cut the lunch sack down to 5 inches and then adhered the front and back pieces.  Some ribbon, a homemade crocheted flower and a wooden button completed this gift bag.

To make the matching card, I used the Hero Arts Time To Enjoy stamp for the sentiment.  I added a few paper punched daisies to frame the sentiment.

Supplies:
Stamps:  Hero Arts-Take Time To Enjoy
Ink:  Versafine
Paper:  Jillibean Soup, Bazzill, Wasau
Misc:  Ribbon, crocheted flower, button, DMC floss, paper punches, pop up dots, lunch sack

Thanks for stopping by,