Showing posts with label Altered. Show all posts

Friday, September 9, 2016

Gifts for My Favorite Teachers


I decided to use my Petite Places dies & stamps to make some back to school gifts for my favorite teachers.  Although they have been back to school for a month, I'm sure they will enjoy this special treat.


I decided that I'm not very good at the stamping part, so I used the dies to cut out card stock.  I meant to take pictures before I put the domes on them, but I forgot.  It's kind of hard to see them, but I am very pleased with the way they came out.  I had some gold star glitter in my stash which I think goes quite well with the teacher theme.  It reminded me of those stars that you had to lick that the teachers would put on our papers.  I guess I'm dating myself!


I saw these cut little jars in Wal-Mart, so I made a smaller one for my friend.  She is working at a charter school this year, and they have a strict no junk food policy for teachers and students.  So, she will have to enjoy the candy part at home, if her husband and sons don't find it first!  I used my Cricut to cut the scalloped circle as none of the Nestabilities seemed to be the right size.


Supplies:
Stamps:  Papertrey Ink-Petite Places School
Ink;  Versafine, Papertrey Ink
Paper:  Recollections, Bazzill
Misc:  Mason jars, baker's twine, candy, star glitter, Petite Places School dies,  Cricut Design Space

Thanks for stopping by,

Tuesday, March 15, 2016

Mini Easter Baskets


These are a super sweet, easy, and fun little baskets to dress up your Easter dinner table.  Not to mention, great for co-workers, teachers, friends and the kiddos!

They are made using 2 ounce portion cups with lids.  I took a miniature cupcake paper and trimmed it down a bit and then attached it to the lid with a pop up dot.


I added a little bit of paper shred and added a little bit of candy.  This actually is holding three chocolate eggs.


To make the handle, I cut the top layer with the My Favorite Things Scallop Ribbon Border Die-Namics Die.  Then I mounted it onto a strip of white card stock. To finish it off, I stamped the sentiment and then added little bows on each side.  The handle is hot glued onto the portion cup.


Just be careful, it makes the portion cup hot and you don't want to burn yourself!

While, it looks like I only made one.......I actually made kits to make these.  You get four in the kit and there is a pink one, a yellow one, a green one, and a teal one in each kit.  Just pop on over to my Etsy Shop if you want to makes some of these.

Supplies:
Stamps:  Papertrey Ink-Scrambled Eggs
Ink:  Versafine
Paper:  Recollections, My Favorite Things
Misc:  2 oz. portion cups, ribbon, glue gun, pop up dots, mini cupcake papers, paper shred, candy

Thanks for stopping by,

Friday, March 11, 2016

You Crack Me Up!


I picked up these little egg cartons at Hobby Lobby a few months back.  They were half off so of course I had to buy two sets!  I thought they would make cute little Easter baskets.

I stamped, paper pieced, and popped up this awesome Purple Onion You Crack Me Up Bunny and adhered him the top of the carton.  Add a sentiment, button, and some baker's twine and it's complete!


I thought this side looked a little naked, so I made a bow using My Favorite Things Bow Die-Namics and stuck it in with a little of Scor-Tape.


Next, I had to add my favorite part....the candy!  I found these tiny bottles of nail polish at Wal-Mart, after Christmas, in the clearance aisle.  They are a perfect size for this egg carton.


Everyone one knows that I can't just make one of anything, so here goes.....


One more for the road...


Supplies:
Stamps:  Purple Onion Designs-Cracked Up
Ink:  Versafine, Momento
Paper:  My Favorite Things, Neenah, Bazzill, American Crafts
Misc:  Copics, buttons, baker's twine, pop up dots, My Favorite Things Bow Die-Namics, egg cartons, candy, paper shred, nail polish

Thanks for stopping by,


Saturday, February 13, 2016

"Berry" Sweet Easter Baskets


I found these super sweet berry baskets at Hobby Lobby.  So, I decided to make some vintage themed Easter baskets, but while I was making them, I realized that they could also be used for any occasion to add a little extra love for someone special.

Supplies:
Misc:  Berry basket, pipe cleaner, seam binding, paper shred, white tulle, silk flowers, stamens

Thanks for stopping by,

Saturday, December 12, 2015

"Berry Christmas" Coffee Gift Baskets


I've been absolutely in love with all of the tiny coffee cups on Pinterest.  I finally ordered some and decided to make some little gift baskets with the berry baskets I found on clearance at Michaels.


So, my little basket is decorated with a die cut doily and pretty paper bow.  Inside the basket you will find a set of two peppermint patties and the tiny cup decorated with images from Papertrey Ink's Tiny Christmas Treats.  In the little cup, I stuck a K-Cup inside to get the party started!


I thought they would be great to add a gift card to the basket as well.  I've always like the light blue and red color combination.  With the snowman, you could use this a winter birthday present or just a way to keep your bff warm!


Great, easy, and fun Secret Santa gifts, especially for your co-workers!


Supplies:
Stamps:  Dandelion Designs-Sweet Christmas Wishes; Papertrey Ink-Tiny Treats Christmas
Ink:  Versafine, Papertrey Ink
Paper:  Papertrey Ink, Recollections, Bazzill
Misc:  Computer generated Sweet Winter Wishes sentiment, berry baskets, paper punches, crimper, paper shred, peppermint patties, ribbon, acetate bags, mini coffee cups, doily die, and bow die

Thanks for stopping by,

Wednesday, December 9, 2015

Mini Mason Jars


Last weekend I sold some of my homemade goodies at craft fair with my sister, Laura, and our Mom.   Laura and I decided that we would do Secret Santa and stocking stuffer type crafts to make/sell.  Mom brought some of her knitted hats and other handmade knit items that she made in her knitting group.  It was about 80 degrees that day, so guess who sold the most!  Our Mom with her knitted hats!   We had a really good time and ate some really good fair food.

 I found these mini mason jars at Michaels (last summer!) and I finally got around to "tricking" them up.  I used a variety of paper punches to make this happy little snowman.  I used the Cuttlebug Snowflake embossing folder to give the tag a little dimension.  Of course, I had to fill it up with some candy!


Here they are all in a row!


Supplies:
Stamps:  Dandelion Designs-Sentiment
Ink:  Memento, Papertrey Ink, Color Box
Paper:  American Crafts, Recollections
Misc:  Mini mason jars, paper punches, pop up dots, Cuttlebug Embossing Folder, candy

Thanks for stopping by,

Saturday, September 26, 2015

Germs Are Scary!!!!


I found these ginormous bottles of hand sanitizer at Target on the clearance rack (a few years ago!)  and decided to dress them up for Halloween.  I had originally planned to use the Frankenstein's Face cut from the Cricut Store, but I couldn't find any green vinyl anywhere.  When I want to do something, I tend to want to do it now, so I'm not a patient person who can wait to get something online!  I had the black, white, and silver vinyl to do most of the face, but then I just made a half oval mouth in the Cricut Craft Room.  I moved the stitches to over his eye, so hopefully will no one will notice that he does not have a nose!  

For the tag, I downloaded the sentiment from Eighteen25.  I cut it out and mounted it on a rectangle of black cardstock.  I added a paper punched pumpkin and then tied it to then eck of the bottle with some black tulle.

I am going to give this to my sister for her new classroom.

Supplies:
Paper:  Recollections
Misc:  Cricut, vinyl, paper punches, tulle, hand sanitizer

Thanks for stopping by,

Monday, September 21, 2015

Paper Bag Pumpkins


One of my favorite things about Fall are pumpkins.  If you add paper punching to the pumpkins...it's even better!  


These were super simple to make.  I spray painted some small brown lunch sacks. Then, I filled them up with crumpled up newspaper and when I ran out of that I used plastic grocery bags.  The top of the bag was bunched together and tied with raffia.


Now the fun part!  I grabbed a variety of paper punches and punched away.  Each one's face is a little bit different.  


To add a little bit more fall to my pumpkin, I punched a sunflower, as well.  I hot glued the sunflower to the center of the raffia bow.

Supplies:
Paper:  Recollections, Bazzill
Misc:  Paper lunch sacks,m paper punches, raffia, pop up dots, white gel pen, hot glue gun, old newspapers/plastic grocery bags, orange spray paint

Thanks for stopping by,

Tuesday, March 17, 2015

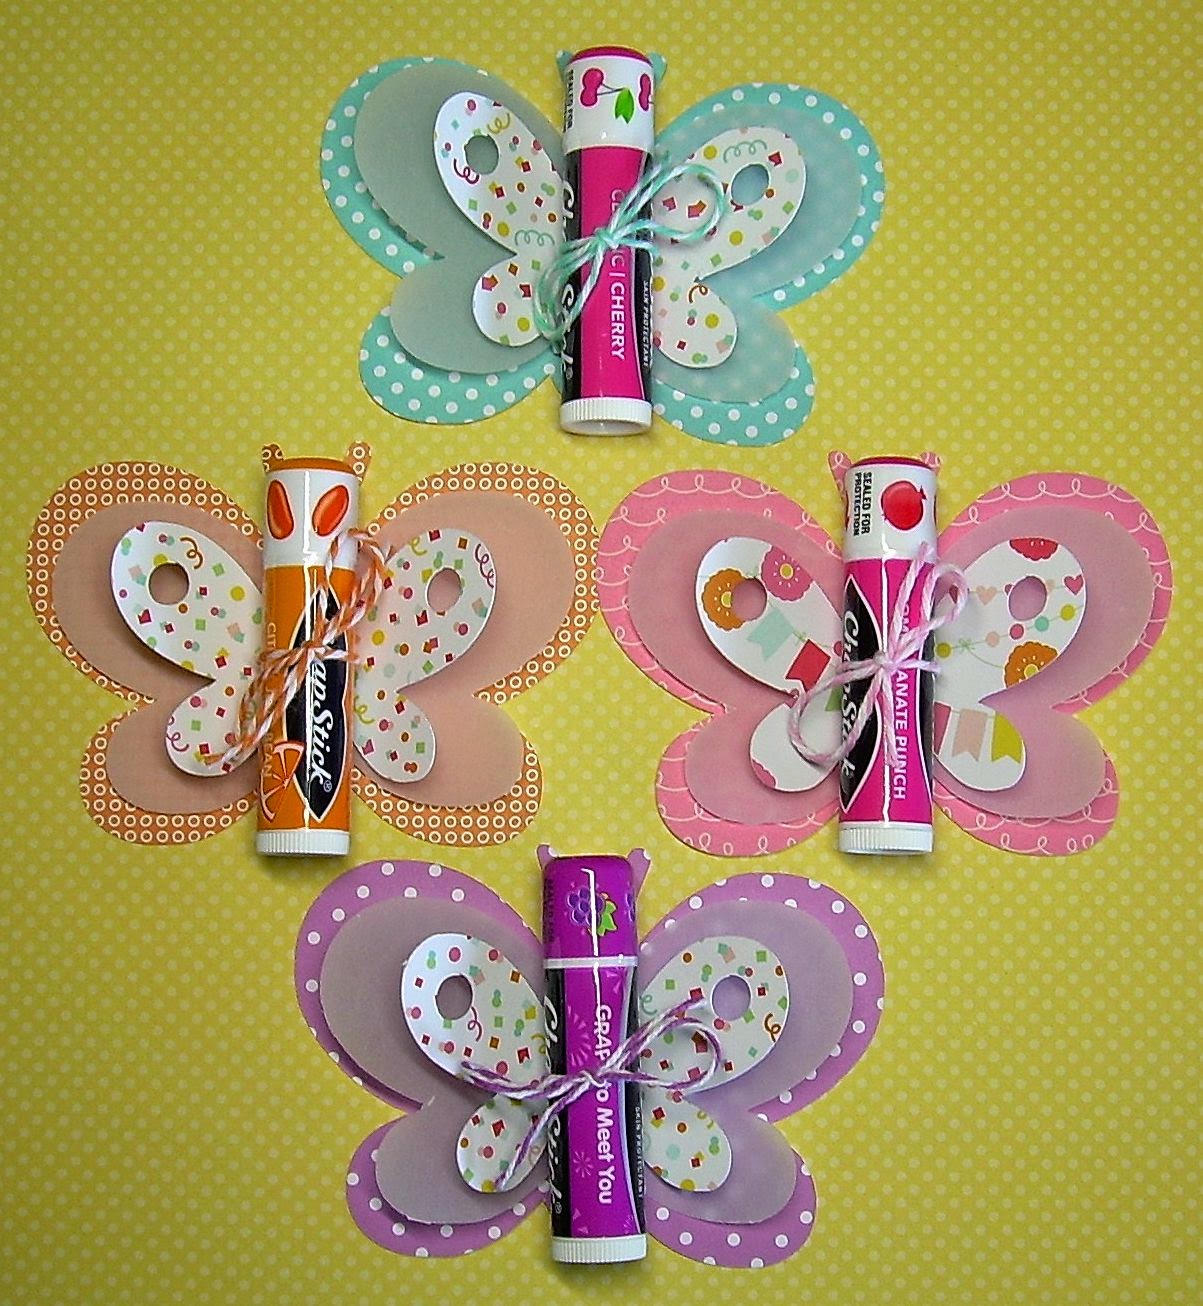
Chapstick Butterflies!


I had originally bought one Chapstick before Christmas to make one of these nifty gifts I found on Pinterest.  Make sure you check out Lori's blog, Mud Pie Studio, she has lots of neat ideas.

Needless to say, I didn't get to make those tags, so I decided to something a little "Eastery" and a little "Springy".  I used this one for my inspiration and went from there to make my own.


I recently bought the monthly subscription for the Cricut Image Library.  I have been having a blast with it,and cutting up a storm!  I would see all of these cute things I wanted to make, but I didn't have the cartridges or there would be only one thing on the cartridge that I wanted.  Not to mention, the cost of all of those cartridges, money is tight for a lot of us, so this is really a good option.  I decided to go with the monthly option at just $9.99 a month.  So far, I've made Mardi Gras decorations for work, cut a bazillion words and numbers because I have all of the fonts now (Whoo Hoo!) and these butterflies.

Using the Cricut Craft Room, I made a few adjustments to the butterfly cut.  It's from Create A Critter, which I have wanted for a very long time, and now I have it!  I added a middle layer of vellum.  I'm really into using up scraps these days, so this is the perfect project for just that.


Here you can see the vellum layer a little easier.  I just cut the butterflies out, layered them, and then sewed up the center so the layers would stay together better.  I punched holes with my Crop-A-Dile on either side of stitched line then thread some baker's twine through the holes.  Just so the Chapstick wouldn't slide around, I added a little snail adhesive on the stitched line and then tied the baker's twine into a pretty bow.  The layers were fluffed up a little and it was done.


These would look really cute in an Easter basket or as party favor.  They can stand up, I just didn't get a picture of it!  It's a nice non-candy treat that any age lady would enjoy!


Target has some special Chapsticks in with their Easter basket fillers section.  You could use any type of lip balm for this project.


Supplies:
Paper:  American Crafts, Recollections, MME
Misc:  Cricut, Create A Critter digital cartridge, baker's twine, Chapstick, sewing machine, Crop-A-Dile

Thanks for stopping by,


Sunday, March 15, 2015

Bunny-Tizers!


Yes, I am still paper punching!  I thought I should make something for Easter that is not candy.  I had these cute little bottles of sanitizer from Bath & Body Works, so I decided to "trick" them up!

These are the same size as the bunnies that I used for my Bunny Clothespins.  I attached the head with some re-positional adhesive so they wouldn't rip if you wanted to remove it to open the top of the sanitizer.

For the back, I adhered a pom pom tail.  Then, I made a cute little tag with a complimentary tiny paper punch flower.


Supplies:
Stamps:  Dandelion Designs-Happy Easter!
Ink:  Memento
Paper:  American Crafts, Recollections, Bazzil
Misc:  Sanitizer, pom poms, paper punches, Tags Bags & More Cricut Cartridge, white gel pen, pink chalk, black Sharpie pen

I made up a few kits to make these and they are posted in my Etsy Shop.  The kits only contain the heads and tails.

Thanks for stopping by,

Wednesday, March 11, 2015

Bunny Clothespins


I've been on a roll with my paper punches!  I decided to decoupage some polka dotted paper onto clothespins, and then adhered my bunny faces on with some pop up dots.  These would be perfect as place card holders for your Easter dinner table, clipped onto a basket/bag of goodies from the Easter Bunny, or even use for a banner/garland to decorate your home!

Supplies:
Paper:  MME, Simple Stories, American Crafts, Recollections
Misc:  Clothespins, pop up dots, white gel pen, pink chalk, Mama Elephant Bow Die, paper punches, Cricut, Modge Podge, black Sharpie pen

Thanks for stopping by,


Monday, January 12, 2015

3 Cheers for Pretty Nails!

I am constantly organizing/re-organizing my craft area, otherwise known as "Craft Central". I recently made a trip to Ikea (it's less than 2 miles from where I live) and bought another table.    I set it up in an "L" shape with my existing table.  Now, I have my Big Kick, Cricut, and my paper cutter all within in reach, and I only have to get up to refill my coffee or go to the bathroom!  I truly love making things, so having this space means the world to me.  If I'm not at work, I'm sitting at my table having a blast!  I've already picked out the next pieces of furniture that I am going to buy, as Craft Central is a work in progress.

So, while I was setting up my table, putting away the Christmas crafts, and re-organizing, I found some extra bottles of nail polish.  Since, it was the day after my Patriots won, in a very narrow, white knuckled, they are making my ulcer hurt game, I decided to use that bottle of polish and punch some paper!  One of the ladies at my Mom's knitting group is also from Massachusetts and she is also a die hard fan.  She is such a good friend to my Mom, and I wanted to make her something to let her know how grateful I am that she is part of my Mom's life.


I made her this little nail polish cheerleader!  While I was making this, I thought they would be perfect for a girls cheerleading squad or favors for a party.  After I punched and assembled her, I attached her to the nail polish with some Scotch Reusable Tabs .  This way you can remove the cheerleader from the bottle without ripping her.

 
This is a side view:


Supplies:
Paper:  Recollections, Bazzill
Ink:  Memento
Misc:  Nail polish, pop up dots, paper dots, black Sharpie pen, Scotch Reusable Tabs, Mama Elephant Dainty Bow Die

Thanks for stopping by,


Wednesday, December 31, 2014

Santa...I Know Him!!!

It seems I did manage to take a few pictures of some items from my "work/craft-a-thon"!  


I made some  paper punch Santa faces, added a computer generated sentiment, and viola, you have Santa-Tizers!


Using those same faces, I made some Santa nail polishes.  I just added little belts made out of cardstock and some tiny buttons.

Supplies:
Paper:  Recollections
Misc:  Paper punches, baker's twine, buttons, Cuttlebug Swirls Embossing Folder, black Sharpie pen, pop up dots, pom poms

Have a safe and happy New Years Eve!

Thanks for stopping by,


Monday, December 29, 2014

Warm Birthday Wishes Tag

What the heck happened to Thanksgiving?!  I can't believe that I haven't posted in almost 2 months, really?!  I've been crafting/creating my life out, too.  I wish I had pictures to show, but, of course, I was so pressed for time that I didn't take any.  We won't mention that my blog got hacked, and it wouldn't let me access to it unless I purchased a domain for it?!  Thanks to two nice gentlemen from Google, I was able to fix it and not have to pay anything.

Let's see, I've worked Thanksgiving, Black Friday, Christmas Eve, and Christmas Day.  For all of our great team members that worked that those days, I made small gifts to show how grateful we were that they came to to work on those days.  So, that would be anywhere from  45-60 people at our venue, multiply that times 4 holidays and that equals way too many to count.  I also did a small craft fair in early December.  The holidays are some of the busiest days for our us here in the tourist area of Central Florida.  Basically, I would get up early craft, go to work, come home, craft, go to bed and just repeat every day......  (Did I mention that I ride my bike to work every day and it's 6 miles each way?)

Additionally, I did some holiday baking.  I sent boxes of homemade treats to my Dad and Brother up in Massachusetts.  I did make some pretty neat tags with my Cricut for the goodies, and even kept an extra one that I will be posting.  

Today, I made a tag for my Mom.  Her birthday is coming up, and she has been reminding us of it!  In our family, we are very proud of our ages and make no effort to hide them.  We love our birthdays!


Of course, I used two of my favorite companies, My Favorite Things and Papertrey Ink.  This tag was perfect to compliment a pretty bottle of hand soap from Bath and Body Works.  I just love that store and could spend lots of $$$ that I don't have in there!


Supplies:
Stamps:  Papertrey Ink-In The Meadow, My Favorite Things-Ice Princess
Paper:  MME, Neenah, Recollections
Ink:  Versafine, Memento
Misc:  Ribbon, sewing machine, pop up dots, rhinestones, Scallop Border Die-Namics, Papertrey Ink Snowflake Die from Winter Penguin Additions, Copics

Thanks for stopping by,

Monday, November 3, 2014

Nail Polish Snowman

Hello and Happy November!  It's actually starting to cool down here, and I am definitely loving it.  It's been an incredibly hot summer and fall this year.  

For the the past several weeks, I've been hunkered down at my table,  a.k.a Craft Central, getting Christmas stuff done for an Open House I did over the weekend.  I've punched, stamped, embossed, cut, glued and colored until all hours at night to just to get things finished!  So, I am going to start sharing with you some of the goodies I made.

I have decided that I am definitely taking the nail polish thing a little too far, but they are cute and inexpensive gifts/decorations.

So, without further ado, here is my Nail Polish Snowman:


As you  can see, a few punches, a little Cricut-ing, and a pretty lace scarf is all it took to dress up this $1.99 bottle of nail polish.  They are quick, easy, inexpensive and a great way to give a little holiday cheer.

Supplies:
Paper:  Bazill, Recollections, K & Company
Misc:  Lace, baker's twine, paper punches, pompoms, pop up dots, black Sharpie pen, white gel pen, Cricut Paper Doll Dress Up Cricut Cartridge

Thanks for stopping by,

P.S.  I have some kits to makes these in my Etsy Shop,

Sunday, September 14, 2014

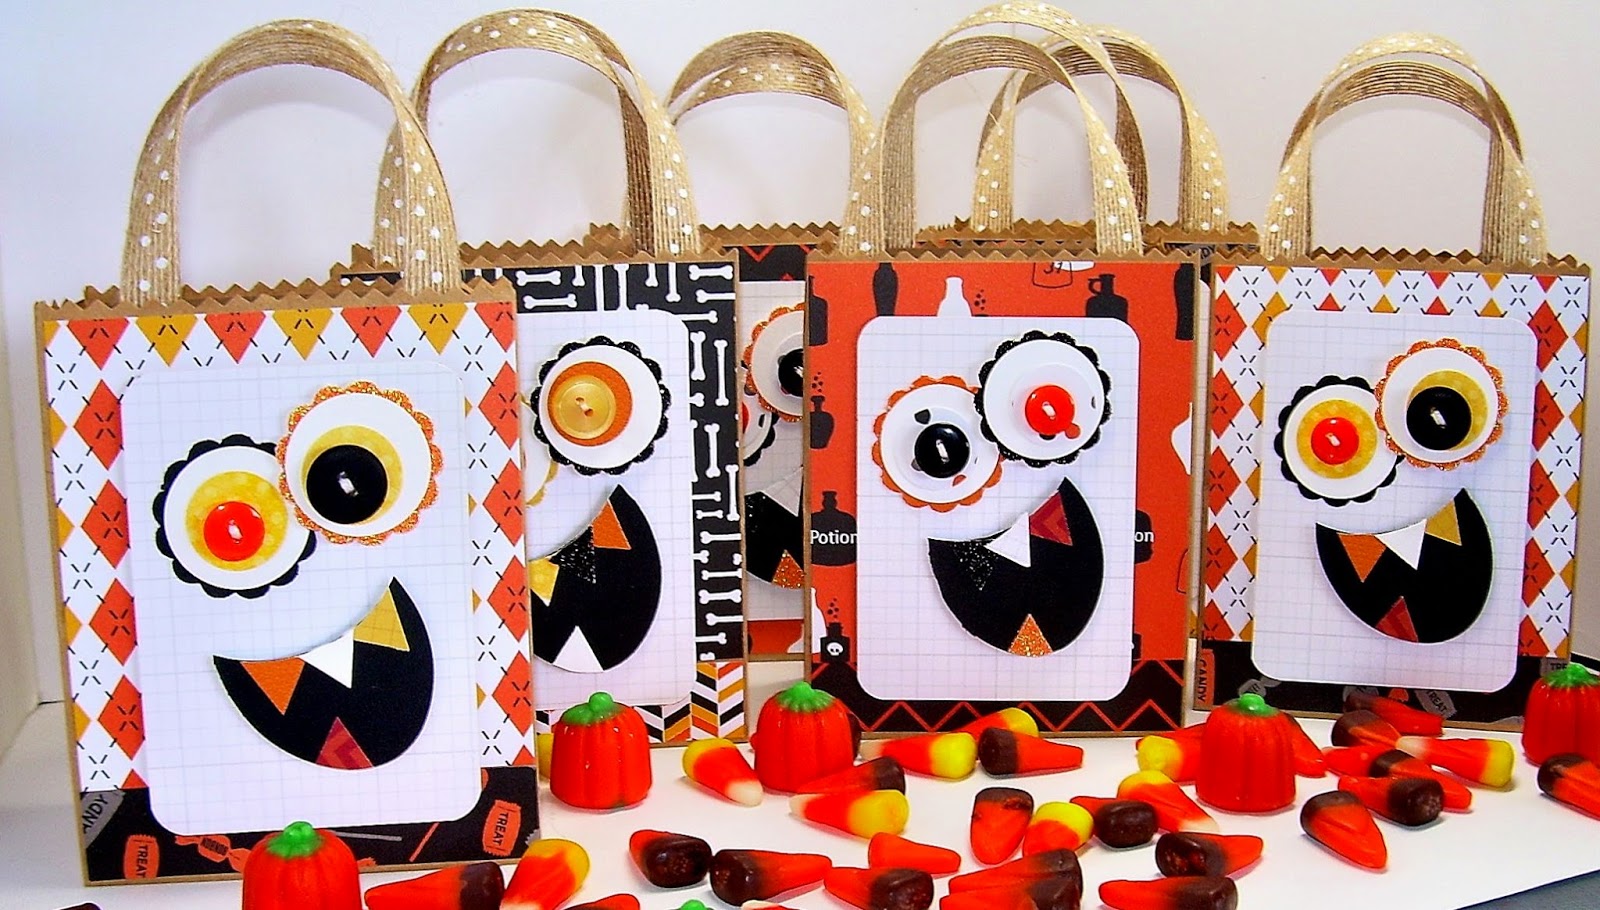
Monster Bags!


I bought my first bag of Autumn Mix of this season and I just had to make up a little treat bag to hold it, before I ate it all!

Using some small paper sacks and ribbon, I made these little shopping bags.  All it took was a  few paper punches, buttons and some scary paper to complete my bags.


Supplies:
Paper:  American Crafts, Recollections, Simple Stories, Bazzill, Bo Bunny
Misc:  Paper punches, ribbon, pop up dots, buttons, small lunch sacks

Thanks for stopping by,

Friday, August 29, 2014

Nail Polish Cupcakes Tutorial


Here is the tutorial to make the Nail Polish Cupcakes.  I decided to a Halloween theme to demonstrate the versatility of this project.  Plus, it's an excellent non-candy treat for your favorite trick or treaters!

You will need one of these, Wilton Nut & Party Cups:

Nut & Party Cups

First, I cut three strips of 1 3/4 inches patterned paper.  Then, using my handy dandy Scor-Pal, I scored every 1/4 inch of all three strips.


Glue all three strips together to make a circle.


Using a hot glue gun, carefully glue your circle around the cup.  This will be the "cupcake" wrapper.


This next step is optional.  I wanted to make my cupcake "taller", so I hot glued the top of a prescription bottle to the bottom of the nut cup.  Then, I adhered, the bottle of nail polish with a small pop up dot to the prescription bottle top.


The frosting was made with some orange paper shred that I just bunched around the stem of the nail polish bottle.


To decorate my cupcake, I made a festive cupcake pick and accented with some tiny button spiders.


Supplies:
Stamp:  Stampendous-Bugs & Hisses
Ink:  Versafine
Paper:  American Crafts, Bazill, Recollections
Misc:  Hot glue gun, pop up dots, Wilton Nut & Party Cup, Nestabilities, Paper punches, tiny button spiders, prescription bottle cover, spider web die cut, paper shred, nail polish

Thanks for stopping by,