Showing posts with label Banners. Show all posts

Thursday, August 9, 2018

Teacher Banner


We have a new teacher in our family.  My nephew, Joe, has a lovely girlfriend who is starting her first teaching job this year as a first grade teacher.  We are so proud of her and I just know that she is going to be amazing.

I thought she needed a banner for her classroom.  So, I used one of my favorite Cricut cartridges, Create A Friend and made a few teachers.  The letters are adhered to "chalkboards".  My sister, who is the model in the picture, informed me that they don't use chalkboards in classrooms anymore.  I have fond memories of clapping erasers outside and making huge flumes of chalk smoke.  I can only imagine what inhaling all of that dust can do you to your respiratory system, but it was a great fun, and an honor to be picked by the teacher.

I've made a few more things for Miss Kelly, so make sure you check back tomorrow.

Supplies:
Ink:  Stamps by Judith
Paper:  EchoPark, Authentique, Bazzill
Misc:  Ribbon, pop up dots, toothpicks, Cricut, Create A Friend Cartridge

Thanks for stopping by,

Tuesday, February 10, 2015

Four Days To Valentine's Day!

 These banners are not just for Valentine's Day.  They are perfect for dressing up any room or event.  I used the Cat's Pajamas Cut Ups Pennants 005 Die to cut out the pennants.  The bases are cut from white card stock and the pennants are cut out of burlap.  Then, I sewed extra large ric rac to connect all of the pennants.


This is one of those projects that is much prettier in person.  I must have taken a zillion pictures of these banners, both inside and outside, and these were the best, but I am still not satisfied.


Supplies:
Paper:  The Paper Company, Recollections
Misc:  Cat's Pajamas Cut Ups Pennants 005 Die, burlap, Cricut Preserves Cartridge, extra large ric rac

Thanks for stopping by,

Sunday, August 10, 2014

Pencil Banner


Here is a great banner to welcome your favorite teacher and students back to school!  It was fun and fast to make!  I just cut some pencils out for each panel, then used my Cricut  to cut the letters out.

Supplies:
Paper:  Recollections, Bazzill
Misc:  Ribbon, Criuct,  Alphalicious Cartridge, circle paper punch

Thanks for stopping by,


Tuesday, November 19, 2013

Happy Hanukkah Banner


I've been working on my Hanukkah goodies.  Here is the banner I made.  I used the Alphalicious Cricut Cartridge, I always use it, but it's the only font cartridge I have!  Each panel is actually 5 different layers.  Using Nestabilities, I cut the first two layers, one in card stock and one in vellum.  The nest layer is a circle cut of white glitter cardstock.  Then, I cut each letter out three times, and layered them to give it a faux chipboard letter look.  Lots of layers, lots of pop up dots.....that's how I roll!


All of the panels are connected with some grosgrain ribbon.  I cut out some Stars of David out of metallic paper and then adhered them to every other panel.


Supplies:
Paper:  Papertrey Ink, Colorbok, Bazzill, Recollections
Misc:  Cricut Alphalicious Cartridge, Nestabilities, pop up dots, Cricut Craft Room Modern Hebrew Alphabet
 
Thanks for stopping by,

Thursday, October 31, 2013

Happy Halloween!!!!!

Happy Halloween!!!!  Today is a great day filled with scary movies, candy, crafting and I have the day off, whoo hoo!!!
 
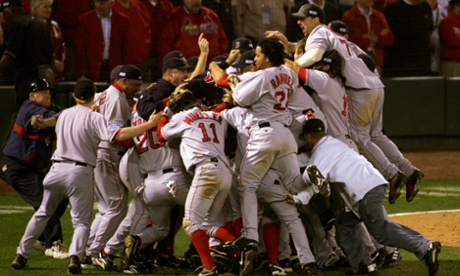
Not to mention, something wonderful happened last night:
 
 
I'm so proud of my boys and their beards for winning the World Series last night!  Oh my goodness, this was definitely a nerve racking series.  The Cardinals, not to mention the Tigers before them, certainly gave us a run for our money!  Shout out to both of those great teams, it was certainly an honor to play with you.
 
So, here is one last Halloween Treat for you:
 
 
These were made using little lunch sacks.  I cut a circle out of each one, using Nestabilities, and adhered a piece of clear acetate inside.    Then, I added a piece of My Mind's Eye Wicked designer paper.


I made some tiny banners using jute, washi tape, and scraps of designer paper.  Then, I embellished the tiny banners with some tiny clothespins, paper punched pumpkins and bats, word stickers, and some tiny button spiders.


Supplies:
Paper:  My Mind's Eye, American Crafts, Echo Park, Bazzill
Misc:  Jute, buttons, Making Memories Spider Die, washi tape, clear acetate, paper punches, small lunch sacks, tiny clothespins, candy, paper shred, Nestabilities, pop up dots
 
Have a spooky night and thanks for stopping by,


Monday, October 21, 2013

Best Witches Banner

 
Just another Halloween Banner!
 
I did the usual, use my Cricut to cut out the letters and each of the banner flags.  Nestabilities were used to cut the vellum that was adhered to the flags with pop up dots.
 
 
The witch faces were made using my Cricut and a variety of paper punches.  The hair was made using some green ric-rak.  I added a few paper punched glitter spiders for a "creepy" but cute look.

 
This banner is actually two separate banners.  Each one of the flags is approximately 5 1/2 inches by 7 inches.  The letters are approximately 3 1/2 inches tall. 

 
The flags are connected with some black tulle.  The top banner measures approximately 33 inches long, the bottom banner is approximately 38 1/2 inches long.
 
Supplies:
Paper:  Echo Park, Recollections, Bazzill
Ink:  Memento
Misc:  Paper punches, googley eyes, pop up dots, ric-rak, Cricut Pretty Pennants Cartridge, Cricut Paper Doll Dress Up Cartridge, Cricut Alphalicious Cricut Cartridge, black tulle
 
Thanks for stopping by,

Wednesday, October 9, 2013

Jack-O-Lanterns


Just another Halloween Banner.  This time I decided to the entire thing with jack-o-lanterns.  They are made using a combination of my Cricut and some paper punches.  Each one has a different face/expression.  I think that is what I like best about it.
 
A couple of close ups:


Supplies:
Paper:  Recollections, We R Memory Keepers, Bazzill
Ink:  Versacolor
Misc:  Cricut Plantin School Book Cartridge, paper punches, ribbon, Cricut Pretty Pennants Cartridge, pop up dots
 
Thanks for stopping by,


Wednesday, September 18, 2013

Halloween Banners

I've been addicted to banners lately, and decided to try making some of my own.  Here are two I made using my Cricut.
 
The first one is my Bite Me Banner:


The second one is my Boo Banner:


I've listed these in my Etsy Shop.  If you are interested in ordering one, just pop on over!
 
Supplies:
Paper:  Bazzill, Echo Park
Ink:  Memento
Misc:  Cricut, paper punches, Stickles, pop up dots, Alphalicious and Paper Doll Dress Up Cricut Cartridges
 
Thanks for stopping by,