Showing posts with label Gifts. Show all posts

Sunday, November 11, 2018

I'm Thankful For You


I made these jars for my Dad and Stepmother.  The church and trees are from the Petite Places line at Papertrey Ink.  I paper punched the pumpkins and the little heart.


I love confetti, sequins, and sprinkles.  I didn't want to go overboard, so I just  put a few into each globe.  Of course, I had to add some candy to each jar.


Supplies:
Stamps:  Papertrey Ink-Fall Friendship Jar Fillers
Ink:  Versafine
Paper:  Echo Park, Bazzill, The Paper Studio
Misc:  Plastic globes, sequins, paper punches, mason jars, Papertrey Ink Petite Places Church & Trees dies, ribbon, Nestabilities, candy

Thanks for stopping by,

Saturday, November 10, 2018

All Treats and No Tricks


These are the last of the Halloween treats that I made.  I can't remember if I've ever made these clothespin witch hats before, but I thought they would go great with these little pails that I have in my stash.


I bought these milk bottles at Michaels, I don't know when!  I filled them up with candy and then added a Impression Obsession die cut to the front.  I cut the witch out with viny.  I made a tag with my Cricut and tied it on to the jar with some pretty organza ribbon.


I'm really pleased that I was able to use up some of my supplies that I've been hoarding all of these years!


Supplies:
Paper:  Papertrey Ink, Recollections, The Paper Studio
Misc:  Milk bottles, Copics, ribbon, paper punches, pop up dots, vinyl, Impression Obsession witch die, mini pails, paper shred, candy, clothespins, Nestabilities

Thanks for stopping by,

Wednesday, October 24, 2018

Open If You Dare


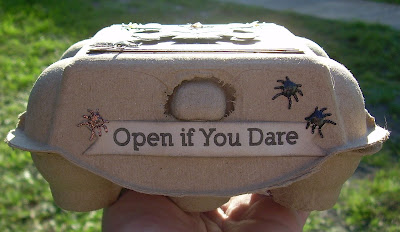
I've been trying to figure out when I bought these egg carts.  I think it's been a few years, but they were next on my list to use.  I thought they would make great treat holders.

The tops were decorated using my Cricut and one of my favorite halloween spider dies.


Lately, I've been having issues with my pictures.  I can't ever seem to get them the way I like them.  So, I'm trying the indoor/outdoor method.  I couldn't decide which ones to post, so I decided to use them both.

Of course, it wouldn't a treat holder unless there were treats on the inside!


 Supplies:
Stamps:  My Favorite Things-Spider Web Stamp
Ink:  Versafine
Paper:  Carta Bella, Bazzill, Recollections
Misc:  Egg cartons, Cricut, candy, paper shred, pop up dots, Diamond Glaze, Memory Box Spider die, Papertrey Ink Banner die


Thanks for stopping by,

Tuesday, August 14, 2018

Back To School Basket


I made a little gift basket for my sister.  This year she is teaching World History and Costuming.  The tag was made from using one of my new stamps that I picked up at the Scrapbook Expo.  I found the basket at the Dollar Tree and filled it with little goodies to help her day go a little smoother.


Supplies:
Stamps:  Paper Nest-Back to School Ellie
Ink:  Momento
Paper:  Echo Park, Bazzill
Misc:  Letter stickers, basket, pop up dots, black tulle, Copics, Diamond Glaze, basket

Thanks for stopping by, 

Sunday, August 12, 2018

Another Explosion Box & Tutorial


I recently joined the JOANN Loves Papercrafters on Facebook.  I've been in awe of the creations that all of those talented people have, so I decided to be brave and post something I made.  I posted the Baby Exploding Box and I received so many wonderful compliments, it just made my heart full.  I also received requests for the directions, and since I had another one to make for another lady at work, I decided to get to work on it.

First, take a 12 x 12 piece of cardstock and score at 3 1/2 inches on each side.


Then, cut out the corner pieces.


Here comes the fun part, time to decorate and embellish!  One thing that I do that I think gives the box a bit more stability is to make double panels (or layers) of paper on the sides of the box.  Here you can see how I decorated the outside of the box.


Next, flip it over and decorate the inside.  I did the two layers of cardstock and then added some die cut doilies.  Since this is for a baby girl, I wanted to give it a lacey girly look.


Next, I made the lid.  Math is not my strong point, so I tend to do things the hard way.  My Dad is a retired Chemical Engineer, my Brother is CFO/CPA, my Sister is a Teacher, and my Mom can figure anything out!  So the technical gene, skipped me!  So, to make the lid I used a piece of white card stock and scored at 1 1/2 inches on two sides.  Now, if you measure the bottom of the box, you will find that it is 5 inches x 5 inches.  At the 1 1/2 score line, I measured 5 inches plus two little lines on the ruler, and then scored on that line.  Then I measured 1 1/2 inches and cut the paper.  Rotate the paper and do the same thing.  Clear as mud?!  You can also try cutting a piece of cardstock 8 1/8 inches and score it on each side at 1 1/2 inches.  You will want to notch the corners on lid so that it will fit inside with showing.

I decorated the top of the box, but forgot to take a picture of it before I put it all together!


I embellished the inside with some paper flowers, butterflies, and two cute babies I cut using my Cricut.  I put a tiny bit of adhesive on the bottom of the shoes to hold them in place.


I put the lid on the box, tied it with a tulle bow and put it next to my purse to bring to work tomorrow.

Supplies:
Stamps:  Papertrey Ink-Baby Button Bits
Ink:  Versafine
Paper:  Bazzill, The Paper Studio, Recollections, Pebbles
Misc:  Tulle, Scor-pal, paper punches, half pearls, pop up dots, My Favorite Things Oval Doily Die, Mama Elephant Mini Bow Die, baby shoes, Cheery Lynn French Pastry Doily Die

Thanks for stopping by,

Teacher Tissues


Tomorrow is the first day of school here in Orange County.  In the event of a few tears or "achoos", I made this box for Ms. Kelly to put on her desk.


I constructed the box with red cardstock and then added two layer panels with coordinating papers.  My little teachers were made using Create A Friend Cricut Cartridge.  The original cut file has the teacher holding a book, but I substituted it with an apple die cut covered in Diamond Glaze.
I also added a little Diamond Glaze to her shoes.  The pointer is a toothpick that I stained with brown ink.  The chalk board is just kraft cardstock with a layer of black cardstock on the top.  With a little white ink, the sentiment was stamped.


The apple is from one of my favorite Cricut Cartridges, Preserves.  The pencil was made using a variety of paper punches, googly eyes and some glasses brads.  All four sides are decorated, so from any angle you can see the designs.

Supplies:
Stamps:  Papertrey Ink-Petite Places School
Ink:  CTMH, Stamps by Judith, Momento
Paper:  Authentique, Bazzill, The Paper Studio
Misc:  Googly eyes, glasses brads, paper punches, pop dots, Cricut Create A Friend & Preserves Cartridges, tissue box, toothpick, Diamond Glaze, Papertrey Ink Apple Die,  Mama Elephant Mini Bow Die

Thanks for stopping by,
Saturday, August 11, 2018

Exploding Baby Box


One of the lovely ladies I work with is having a baby, any day now.  I haven't made an explosion box in awhile, so I thought this would be the perfect time.  The pictures are kind of hard to see because the base of the paper is white and my background is white.  But, its this super cute grey and blue fox paper by Echo Park.


The box is made with two layers of panels on  both the outside and the inside of the box.  The lid held it together, but I have some white tulle and I love the way it looks when use it for a bow.


Are you ready for the big reveal to see what's inside of the box?


Tiny sneakers!!!!!  I just love baby shoes.  I know they don't get to wear them for very long, but I think that they are super cute.


I embellished the inside of the box with some Quickutz Fox die cuts, My Favorite Things Die-namics stars and sentiments from Papertrey Ink Baby Button Bits.

Supplies:
Stamps:  Papertrey Ink-Baby Button Bits
Ink:  Versafine
Paper:  Echo Park, The Paper Studio
Misc:  Scor-pal, buttons, My Favorite Things Stars Die-namics, Quickutz Fox Die, white tulle, pop up dots, tiny sneakers

Thanks for stopping by,


Monday, April 2, 2018

Petite Places Berry Baskets


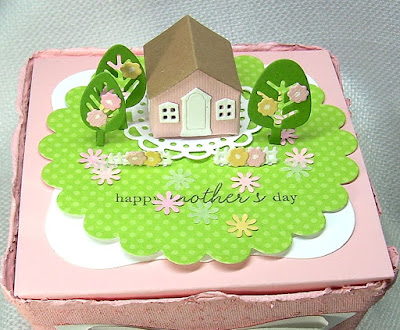
I decided to work on some Mother's Day gifts today.  I'm really trying to use up stuff I already have and not go buy more.  So, I was able to use berry baskets, plastic ornaments and some of my favorite dies from Papertrey Ink and My Favorite Things.


I actually remembered to take a picture, before I glued the top on!  All I did was just die cut a lot of little pieces and make a pretty spring house.  This is actually the School House Petite Places die, I just omitted the front part.


I always have to make more than one!

Supplies:
Stamps:  Papertrey Ink-Blooming Button Bits
Ink:  Versafine
Paper:  The Paper Studio, Recollections, Bazzill
Dies:  Papertrey Ink-Petite Places Trees & Schoolhouse
My Favorite Things-Mini Doilies and Bows
Misc:  Plastic ornaments, berry baskets, paper punches, white gel pen, Nestabilities

Thanks for stopping by,

Sunday, April 1, 2018

Happy Easter!


The Easter Bunny made a stop at work this week.  Tiny buckets filled with candy topped off with a pretty pencil and chenille bunny surprised the team.  A Bunny Kiss and a few Nugget Bunnies rounded out a great treat.

I hope you have a Happy and Fun Easter!

Thanks for stopping by,


Saturday, March 31, 2018

Bunny Kisses


The Easter Bunny is coming!!  Here is a quick and easy project that will surely put a smile on everyone's face.  These are perfect for co-workers, place setting markers for your dinner table and great basket stuffers.

I used the Impression Obsession Die 043-G to cut the bunnies.  I cut two bunnies for each kiss.


First, I cut a toothpick in half and then using a white craft glue, I sandwiched the toothpick inbetween two of the bunnies.  To give the bunnies a little color, I used my Cricut to cut out some bows, but you could use ribbon or even little flowers.  To finish them off, I stuck them into the top of the Hershey Kiss and viola...they are done!

I almost forgot, don't you forget to add a fluffy bunny tail using a small pom pom!

Supplies:
Paper:  Authentique, The Paper Studio
Misc:  IO Die 043-G, Hershey Kisses, toothpicks, Cricut, white craft glue, mini pom poms

Thanks for stopping by,


Thursday, December 15, 2016

Hershey Kiss Turkey


This was a little treat that I made to decorate my sister's Thanksgiving table.   Once again I used my Cricut to cut the little turkey out.  The body and the feathers are two separate pieces.  I sandwiched a toothpick between them and then adhered them together with pop up dots.  The toothpick was trimmed down and then I stuck it into the Hershey Kiss.  They were pretty simple to make and were a big hit!

Supplies:
Paper:  Bazzill, Recollections, Echo Park
Ink:  Stamps by Judith, Heidi Swapp
Misc:  Toothpicks, pop up dots, Cricut, Hershey Kisses

Thanks for stopping by,   

Tuesday, December 13, 2016

Take Out Santa

Time sure has a way of slipping by, really fast!  Besides working, I've had two craft fairs and just came back from spending a week with my Dad in Massachusetts.  I have been working non stop on my crafty adventures, yet didn't take photos  of every thing.  I did take some, and I just edited them all, so I'm going to start posting.  There are few goodies left from Halloween and Thanksgiving that will be sprinkled in with the Christmas crafts.  

A few years back, after Halloween, I bought a whole bunch of take out boxes that where on clearance for 90% off.  I really just wanted the handles so that I could make different boxes.  I finally got around to making them and thought they would be perfect to pack a small Christmas gift or baked good.


Using some paper punches, Nestabilities, and my handy dandy Cricut Explore, I was able to make the face for my Santa.  I absolutely love the Cricut Explore, the possibilities are endless!  For added dimension, I used an embossing folder, textured paper, and my favorite pop up dots.  I tied the candy canes to the top with a piece of baker's twine to make it look like chop sticks on top of Chinese food take-out.


Supplies:
Paper:  Bazzill, Recollections
Ink:  Versacolor
Misc:  Candy canes, baker's twine, paper punches, white gel pen, Cricut, Stickles, My Favorite Things Scalloped Border Die-Namics, Cuttlebug Swirls Embossing Folder, take out box handle

Thanks for stopping by,


Thursday, October 6, 2016

Halloween Tags


I had originally scheduled to share this post this morning, but I was in a rush to get to work as I didn't know how long I was going to be able to stay.  We are on high alert here in Florida waiting for Hurricane Matthew.  I did leave work early and started watching the news, but it was starting to scare me so much, that I couldn't watch it anymore.  We've had brief periods of rain and a little wind, and now the sun is shining.  The worst is supposed to come late tonight early tomorrow morning.  I just hope I don't loose power.

Now, onto something more fun!

I am having so much fun using my new Cricut Explore.  It's the coolest thing!  Today, I am showing some tags I made for my sister, cousin, and a few of their colleagues at their school.

I used the Cricut to cut out the skeleton, tombstone and the actual tag.  The grass and tab are both dies from My Favorite Things.  The sentiment is from Papertrey Ink.  I paper punched the pumpkins and the bats.  To personalize each tag, I used my typewriter to print out their names.


Supplies:
Stamps:  Papertrey Ink-Boo To You
Ink:  Versafine, Heidi Swapp, Momento
Paper:  Echo Park, Recollections, Bazzill
Misc:  Cricut, paper punches, baker's twine, pop up dots, typewriter

Thanks for stopping by,

Wednesday, October 5, 2016

Spider Jars


I had so much fun making the school house mason jars for my favorite teachers, I wanted to try something for Halloween. I found some cute beaded spiders on Pinterest and decided that they would be perfect.  I made a few modifications to make them fit.

I actually remembered to take pictures off the top before I glued the the top of the dome on.  I used my Cricut to cut the scalloped circle and added some orange sequins.


You can't forget to add a goodie to the jar, I chose one my favorite Halloween treats!


You can't really see it, but there is also a small black spider web that I cut out with my Cricut, as well.


Here is a close up of the tag.  It's just a simple one with a paper punched pumpkin and a stamped sentiment.


This is the first spider I made before I shortened the legs to fit inside the done.


Supplies:
Stamps:  Studio G-Trick or Treat
Ink:  Versafine, Heidi Swapp
Paper:  Graphic 45, Bazzill
Misc:  Cricut, Ball Mason Jar, orange sequins, beads, wire, ribbon, baker's twine, pop up dots, paper punch, plastic dome ornament

Thanks for stopping by,