Wednesday, September 21, 2011

Mint To Teach!


I had a few extra Altoid tins in my stash and decided to make some teacher appreciation gifts.  The sentiment is computer generated.  They are really simple to make, just a little ribbon, brad, and Nestabilities, and they are done.  I wish I could remember the name of the designer paper, but I only had a scrap of it left!  It's definitely only of my favorite papers.


Inside View

Thanks for stopping by,

Tuesday, September 20, 2011

BBTB2 Challenge-3D TBB&M


I made the little spider from a Reeses Peanut Butter Cup and some paper punches.  Using clear acetate, I cut the triangle box from the Tags, Bags, Boxes & More Cartridge.  I added a some green paper shred and made a little "nest" with candy corn and pumpkins for the spider.  The top is held closed with a bow.    I used the Justrite set, "Witch Way To The Treats" set to make the medallion for the center of the bow.  It's kind of hard to see in the picture, but I added a little orange rhinestone on the spider.


Supplies:
Stamps:  Justrite-Witch Way To The Treats
Paper:  K & Company, Recollections, Bazzill
Ink:  Versafine, CTMH
Misc:  Green paper shred, paper punches, pop up dots, white gel pen, candy, Nestabilities, orange rhinestone, ribbon, Scor-Tape,  Cricut

After I finished taking pictures of this, I turned around and this is what I found laying on my bed.  I couldn't resist taking their picture.  They are so tired, probably because they spent the night (while I was trying to sleep) running around my bedroom with out touching the floor!


Thanks for stopping by,


Friday, September 16, 2011

Pop! Pop! Fizz! Fizz!...


Good Morning!  Here is a great way let you know how much you appreciate your favorite teacher.  I printed the sentiment out on the computer.  Using the Cricut Preserves Cartridge, I cut the center of the apple out on clear acetate.  This way, I could put the clear part over my sentiment (so it's centered), traced it, and then cut it out.  It was pretty simple, except, I can't find the overlay for the Preserves Cartridge!   Dang it!  I looked in everywhere for it!  So, I had to keep referring back to the handbook to see what buttons to push.  This made it took a lot longer.   I cut each layer (except the sentiment) twice and sandwiched the layers with foam tape to give it a little extra dimension. Using my Crop-A-Dile, I punched holes on either side of the apple stem to insert the ribbon.  This holds the tag onto the bottle, and the awesome teacher can easily remove the tag ( without ripping the paper) and enjoy the refreshing beverage.


Supplies:
Paper:  Recollections, Bazzill
Misc:  Cricut Preserves Cartridge, ribbon, bottled soft drink/sparkling water, pop up dots, computer generated sentiment.

Thanks for stopping by,


Wednesday, September 14, 2011

Halloween Candy Bar Wrappers


**Please note the link has been updated to Skip To My Lou's Blog**

I found the idea to make these candy bar wrappers in magazine while I was waiting to have a prescription filled.  For the last two weeks, I've been having a lot of dental work done including some oral surgery that I had on Monday.  I still can't eat solid food (so making these candy bars was complete torture!) and my face is swollen and bruised, but I'm on my way to having a beautiful smile!

You can the find template to make the wrappers here.  I used the template, but I made a few changes.  To make the faces, I used some paper punches and the Cricut Cartridge Paper Doll Dress Up.  The candy bar is attached with some snail adhesive, but I had to tied a ribbon around to hold the sides down.  I added a simple stamped tag and I was done.  These are easy enough for the kids to make.


Inside view.


Supplies:
Stamps:  Studio G-Series 12 and Series 20
Ink:  Versafine
Paper:  K & Company, Bazzill, Colorbok, Recollections
Misc:  Hershey Bars, Nestabilities, paper punches, pop up dots, sharpie pen, Paper Doll Dress Up Cricut Cartridge

Thanks for stopping by,

Thursday, September 8, 2011

Luggage Tag


Tomorrow is my Dad's birthday, and I'm always looking for fun and new ways to package his gifts.  I found these little suitcases at a candy store near the movie theatre.  So, of course, I bought some and thought I could "trick" them up!  For Dad, I made a kind of vintage looking luggage tag.

It was pretty simple to make.  The tag is cut using the Tags, Bags, Boxes & More Cricut Cartridge.   Using some pop up dots, I adhered some fun vintage looking embellishments.

Close up of luggage tag, click on picture for a larger view.

Supplies:
Ink:  Tim Holtz Tea Dye
Paper:  Recollections, Bazzill, Studio 112, Gartner Studios
Misc:  Cricut, Tags, Bags, Boxes & More Cartridge, K & Company Metal Art Keys, Sticko Nostalgiques Alphabet Stickers, baker's twine, brads, slot punch, pop up dots

Thanks for stopping by,

Tuesday, September 6, 2011

American Flag Card

I'm groaning very loudly while I write this post!  I just got home from working a seven day (in a row) stretch at work.  Some of the days were 12 hours long, on my feet!  I'm exhausted.  I, at least, have tomorrow off, but...I have a dentist appointment!  What a way to spend my day off, yuck! 

I finished this card yesterday, but didn't have time to post it before I left for work.  It's a combination Labor Day Card and a 9/11 Commemorative Card. I cased it from this card I found blog surfing one night. 


Instead of using an edge puncher, I used my Die-Namics Scallop Ribbon Border and cut one of the scallop edges off.  Machine stitching was added on to the border strips before they were adhered  to the card base.  After I adhered the strips on, I machine stitched all around the the card base. 


I cut a square of blue cardstock and machine stitched around the edges.  Paper punched stars were added with matching ivory buttons glued to the centers.


I puffed up the scallop border a little, just to give it a little extra dimension.

Supplies:
Paper:  October Afternoon, Bazzill, Recollections
Ink:  Tim Holtz Antique Linen
Misc:  Star paper punch, sewing machine, Die-Namics Scallop Ribbon, pop up dots

Thanks for stopping by,


Tuesday, August 30, 2011

My First Tilda Card

This is my first attempt using a Tilda stamp.  I found this great card and decided to case it.  I messed up coloring the hair bun and earrings, so I just decided to color/cover it up.  I added a little Diamond Glaze to her sash, flower broach, and shoes for added dimension.

Supplies:
Stamp:  Magnolia-Noble Tilda
Ink:  Memento
Paper:  Bazzill, October Afternoon, Recollections
Misc:  Nestabilities, seam binding, pop up dots, sewing machine, paper roses, Copics, Diamond Glaze, paper punch

Thanks for Stopping by,

Friday, August 26, 2011

Tutorial for Pencil Box Inserts

Sue asked for the dimensions for the inserts for the pencil boxes.  Sorry it took me so long!

The inserts are made using two pieces of cardstock. All measurements are done in inches. 

The part that holds the little pencils is 5 1/4 x 4 3/4.  Score along the 4 3/4 side at 1 1/4, 2, 2 3/4. Use a corner rounder on the edges so they fit in the nugget tin.


The other insert that holds all of the little supplies is cut 2 x 8 1/4.  Score at 1 3/4, 2 1/2, 3 1/4, 5 ,5 3/4, 6 1/2 .  Use a corner rounder on the top corners.

Just fold and insert into the nugget tin.  I used adhesive on the valley folds to hold them together and then added a little adhesive into the nugget box to hold the inserts in the box. 


Thanks for stopping by,

Wednesday, August 24, 2011

Back To School Paper Pouch

Sorry it's been so long since my last post.  I've been very busy!  My brother and his girlfriend brought my niece, Katie, down for school.  I'm so excited, now I have all of the nieces and nephews together!  Then, Laura and I went to the pre-season Patriots vs. Buccaneers game!  It was so awesome!
That's Mr. Tom Brady, the greatest quarterback in the world!

I worked a bunch of extra shifts at work, as I needed the game day off and my birthday!  I turned 43 on Saturday and we had a great day.  Mom, Laura, Jenny, and Joe came and we went to have enchiladas at a little Mexican restaurant that I like and then to Violette's, the greatest scrapbook store in the world.    My family gave me some wonderful presents including a Red Sox Spring Training Windbreaker and my Mom and Chuck bought me a Gypsy!  I can't believe it, it was way too much money!  It is being shipped, so I am anxiously awaiting it's arrival.  I've been wanting one for a very long time.  I've been also working on my tutorial for the ScorPal book, but it's taking me longer than expected as I'm so nervous about making it perfect, that I'm making some mistakes.

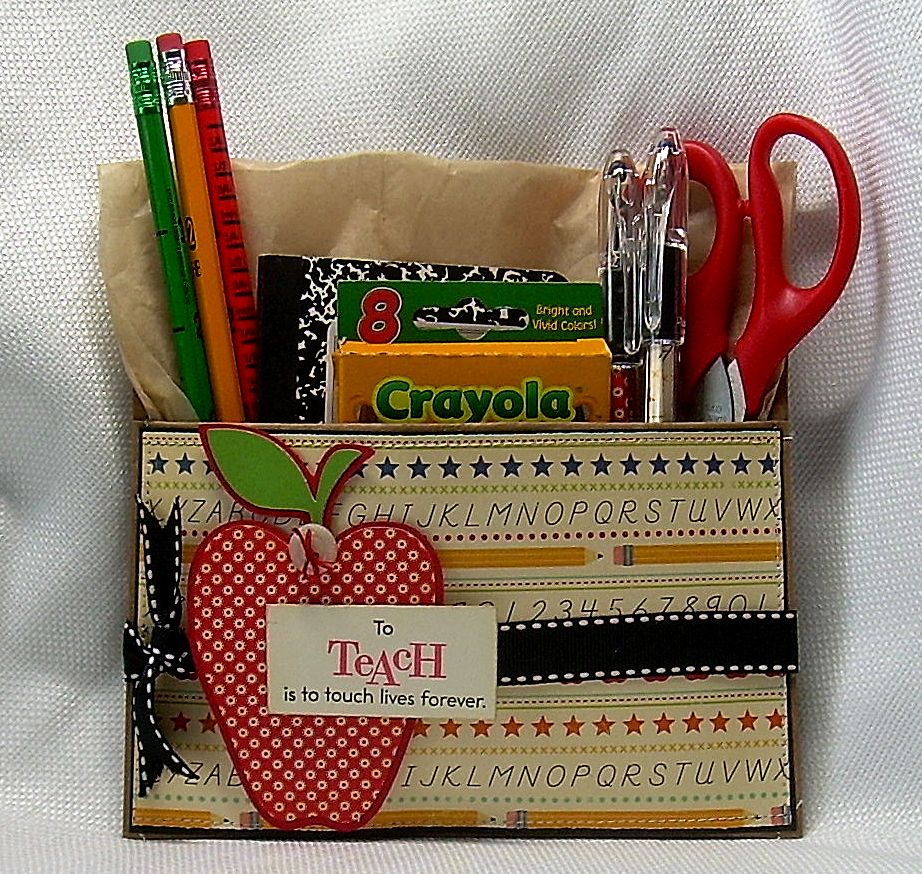
For today's post/project, I made one of my paper lunch sack pouches.  This is a bigger sack than the lunch sack.  But, I made it the exact same way.  You can find the instructions on this post.  My sister, Laura, is mentoring a brand new teacher this year, so I'm excited to make some fun teacher themed things for her.  I made her this paper pouch with some supplies for the upcoming school year.

Click picture for close up.

I used some October Afternoon Schoolhouse Paper for the front panel.  You probably can't see it, but I machine stitched around the panel.  The apple is cut from the Cricut Cartridge, Plantin Schoolbook.  The sentiment is from Papertrey Ink's Teacher's Apple set.  The edges on everything are inked with Tim Holtz Antique Linen ink.

Here is a close up of the apple:


Supplies:
Stamps:  Papertrey Ink-Teacher's Apple
Ink:  Versafine, Memento, Tim Holtz
Paper:  October Afternoon, Bazzill
Misc:  Paper sack, ribbon, pop up dots, tissue paper, button, dmc floss, sewing machine, school supplies

Thanks for stopping by,

Tuesday, August 16, 2011

More Pencil Boxes

I made two more back to school pencil boxes for my nieces, Kate and Jenny. 

 Kate is attending UCF this year and we have been anxiously awaiting her arrival to Florida.  So, I thought a Florida themed pencil box would be appropriate.


  Jenny loves all things horses, so I found these great horse sticker embellishments by Jolee's that would be perfect.


I made the inserts for the school supplies the same way as the boys' pencil boxes. Small mechanical pencils, paper clips, erasers and matching nuggets fill each pencil box.


Supplies:
Paper:  October Afternoon, Martha Stewart, Recollections, Debbie Mumm
Ink:  Tim Holtz
Misc:  Paper punches, Quickutz Florida die, glitter chipboard letters, Martha Stewart Doily, half pearls, ribbon, pop up dots, Scrabble Tiles, Scor-Tape, ScorPal, Jolee's Horse Embellishment, school supplies, nugget tins

Thanks for stopping by,


Saturday, August 13, 2011

Have A Wonderful Day!


Just another quick card/post before I rush off to work.  I used some of my products from Papertrey Ink to create this card.  It could be used for any special day, including as a birthday card.  Just in case anyone forgot, my birthday is just 7 short days away!

Supplies:
Stamps:  Papertrey Ink-Flower Fusion #1
Ink:  Versafine, Tim Holtz, Memento
Paper:  My Mind's Eye, Recollections
Misc:  Papertrey Ink dies-buttons, swatch, label, pop up dots, dmc floss

Thanks for stopping by,

Friday, August 12, 2011

It's Your Birthday!


Here a quick post before I have to run to work.  It's another birthday card I made using stamps from one of my favorite companies, Dandelion Designs.  The flowers were made using Martha Stewart punches.

Supplies:
Stamps:  Dandelion Designs
Ink:  Versafine, Memento, Versamark
Paper:  Bazzill, Wasau, My Mind's Eye
Misc:  Copics, Nestabilities, sewing machine, half pearls, paper punches, pop up dots

Thanks for stopping by,


Wednesday, August 10, 2011

Birthday Wishes


My Mom was over last week and she needed a birthday card for Jenny.  While we were going through my stash, I realized that I hardly have any birthday cards.  Since MY birthday is only 10 short days away, I thought I would make up some birthday cards.

It was a pretty simple card to make.  I love this paper from Crate Paper and I thought it would compliment this digital stamp from LORI designs, Lollipop Ella.  I made a simple square card and inked the edges with some brown ink.  The borders on the panels were all stitched with the sewing machine.  The sentiment is from the 2009 Papertrey Ink Anniversary Set.  A little ribbon and some pearls finished off this card.

Supplies:
Stamps:  LORI designs-Lollipop Ella (digital), Papertrey Ink-Round & Round 2009 Anniversary Set
Ink:  Versafine
Paper:  Crate Paper, Bazzill
Misc:  Copics, white gel pen, ribbon, Nestabilities, pop up dots, sewing machine

Thanks for stopping by,


Tuesday, August 9, 2011

Back To School Pencil Boxes


I made a few pencil boxes for my nephews.  Even though they are teenagers, Dave is 19 and Joe is 16, I still thought they needed some extra school supplies "Aunt Bunny Style"!

Using nuggets tins from Papertrey Ink and my handy dandy ScorPal, I made dividers to hold the goodies inside.  To personalize the pencil boxes, I chose the Private Message stamp from Kraftin' Kimmie for Davey as he is an Army ROTC at UCF. His name was cut out using the Cuttlebug Red Tag Sale alphabet.

Joe, in addition to be a robotics expert (yet, he called me a nerd as I studied geology and geography in college!), is going to be next Jimi Hendrix (at least in my eyes!).  I used some Reminisce letter stickers to spell is name and then stamped "You Rock!" using the stamp from A Muse.  The guitar is  a Jolee's Boutique Dimensional Sticker.

Here are pictures of the inside of the pencil boxes.  I added a few nuggets, wrapped matching paper, for a sweet treat while they are studying.

The sentiment on the nuggets is "We love our troops! from Clear Dollar Stamps Patriotic Nuggets.


Supplies:
Stamps:  Kraftin' Kimmie-Private Message, Clear Dollar Stamps-Patriotic Nuggets
Ink:  Versafine, Memento
Paper:  Piggytales, Recollections, Bazzill, Wasau, Colorbok
Misc:  Copics, ribbon, button, nugget tins, Cuttlebug Alphabet, Guitar Sticker, Nestabilities, Reminisce Alphabet Stickers, brad, school supplies, pop up dots, Scor-pal

Thanks for stopping by,


Sunday, August 7, 2011

All Things Grow With Love


Here is quick card I made using Papertrey Ink's Blooming Button Bits stamp set.  I double stamped the leaves and attached them with pop up dots for a little dimension.  I used the Beautiful Blooms II  #1 Die Collection to cut the flower.   The butterflies were cut using a Martha Stewart punch and the butterfly die from My Favorite Things.  To finish off the embellishing, I added a machine stitch around the front panel, tied a piece of lace around the card, applied some liquid pearls and a few buttons.  Presto!, it's done!

Supplies:
Stamps:  Papertrey Ink-Blooming Button Bits
Ink:  Memento, Versafine
Paper:  Graphic 45, Wasau, Bazzill
Misc:  Pop up dots, liquid pearls, lace, butterfly punch, My Favorite Things Die-namics butterfly die, Papertrey Ink Beautiful Blooms II #1 die collection, buttons

Thanks for stopping by,


Monday, August 1, 2011

Toilet Paper Apple


Did you ever make one of those pumpkins with the rolls of toilet paper that where so popular a few years ago?  I made one for my Dad, the retired engineer, who knew immediately that it was a roll of toilet paper!  I've been having trouble sleeping lately and late one night, it came to me....how about using the same concept to make an apple for the teacher?!

So, this is what I came up with.  I cut a 22 inch square of red fabric, placed a roll of toilet paper in the middle, and carefully tucked the ends in the tube.  I made a stem out of kraft cardstock that I run through crimper and inked with brown ink.  The leaf is cut out of this fluffy green wool felt I found at Michaels.

The tag is made using Nestabilities and the Teacher's Apple set by Papertrey Ink.  I added a few buttons, ribbon, and some tiny clothespins.  I think that it would look great on any teacher's desk!

Top view, the core just sits in the top, just in case you need an emergency roll!

Supplies:
Stamps:  Papertrey Ink-Teacher's Apple
Paper:  Bazzill, unknown designer paper
Ink:  Memento, Versafine
Misc:  Nestabilities, buttons, mini clothespins, foam tape, wool felt, crimper, DMC floss, toilet paper roll, fabric

Thanks for stopping by,