Monday, October 31, 2011

Happy Halloween and Ugly Brownies!

Happy Halloween!  This is one of my favorite holidays and I don't have to work!  Yay!!  I plan to watch some scary movies and pass out some candy.

I made these ugly brownies with my new Magic Brownie Pan for my nephew, Joey.  The pan is awesome, but the brownies look horrible!  I need to practice my decorating skills!  But, they taste super delicious!


Gotta run, I have to get ready for my date with Freddy, Michael, Norman and Jason!

Thanks for stopping by,


Friday, October 28, 2011

Halloween Candy Pouches


I made 11 little candy pouches for some friends and family for Halloween.  They are simple to make, I just used a 6 X 12 piece of patterned paper, some ScorTape and a crimper.  You make the little sack, fill it with candy, seal the other side, and then pink the edges.  The ghost is from the Cricut Cartridge Paper Doll Dress Up.  I paper punched some eyes.  To personalize each pouch, I stamped their names.  Then I added a little embellishment and a black seam binding bow.


Supplies:
Stamps:  Studio G-Alphabet
Paper:  Debbie Mumm, Recollections
Ink:  Versafine
Misc:  Cricut Paper Doll Dress Up Cartridge, pop up dots, seam binding, paper punches, black sharpie, crimper, ScorTape, black sharpie pen, white gel pen, candy

Thanks for stopping by,

Wednesday, October 26, 2011

Halloween Goody Bags


I made these little goody bags for my Mom's knitting group that meets each Monday.  The tags were made using my favorite "Another Halloween In The Bag!" stamp.  I added some googly eyes and a pumpkin embellishment from K & Company.  The spider is a Martha Stewart Paper Punch, which I punched twice, folded one, and then glued it on top for a 3-D looked.  I spritzed a little glimmer mist on the spider.  I filled a medium sized glassine bag with some candy, and attached the tag with a little clothespin that was decoupaged with some matching paper.


Here is a close up of the tags:


Supplies:
Stamp:  Rubber Cottage-Another Halloween In The Bag
Ink:  Versafine
Paper:  K & Company, Recollections
Misc:  Glassine bags, candy, mini clothespins, Modge Podge, googly eyes, K & Company Pumkin Embellishments, ribbon pop up dots, spider paper punch, Glimmer Mist

Thanks for stopping by,

Tuesday, October 25, 2011

Happy Haunting Tag


I've been watching Paranormal Activity 1 and 2 today.  Now, I love scary movies, but these are actually scaring the living daylights out of me.  I had to turn the second one off just a few minutes ago because I knew what was coming!  It's almost to the end, but I just can't do it.  Maybe if it was still daylight, I could finish it, but no way!  I needed to do laundry, but the laundry room is on second floor of my apartment building, and I am NOT going outside!

I made this tag for a trick or treat bucket for my niece, Katie.  I'm going to mail it to her at school, so it will be a surprise!  In addition to some candy, I added a funny Bill Murray movie.  Not everyone in my family shares my passion for scary movies, though, I do wish one of them was here right now!

The bucket filled with goodies!

Supplies:
Stamp:  Savvy Stamps-Happy Haunting
Ink:  Versafine
Paper:  K & Company, Recollections, Papertrey Ink
Misc:  Nestabilities Tags, Papertrey Ink pinked square die, Martha Stewart bat punch, orange button, half orange pearls, half black pearls, K & Company Frog, pop up dots, ribbon, baker's twine

Thanks for stopping by,


or

Monday, October 24, 2011

Vampire Candy Tubes


My sister gave me this huge plastic tube and asked if I could do something with it.  It's this ginormous acetate box.  Here is the tutorial on Splitcoast for the acetate box.  Well, it's been sitting in the corner of my closet for some time now, and I finally decided what I could make.  Using the same concept as the candy bar wrappers.  I made the heads and hair using the Paper Doll Dress Up Cricut Cartridge and paper punches to make the faces.  The tags are made using JustRite Witch Way To The Treats Stamp Set, a paper punched pumpkin and Nestabilities.


Here is a close up:


Supplies:
Stamps:  JustRite-Witch Way To The Treats
Ink:  Versafine
Paper: K & Company, Recollections, Bazzill
Misc:  White gel pen, ribbon, acetate tube, stickles, pop up dots, paper punches, Cricut Paper Doll Dress Up, Stickles, candy, Crop-A-Dile

Thanks for stopping by,

Thursday, October 20, 2011

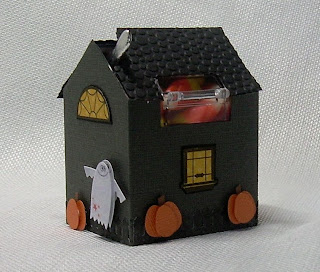
Halloween Candy House


Have you ever seen those little plastic houses at Michaels?  They are in the front of the store, with the different colored M & M's.  I decided to decorate one of Halloween. 


I made a pattern so I could wrap the cardstock around the house.  The roof is embossed with the Bubbles Cuttlebug Embossing folder.  The windows are made using the Papertrey Ink Stamp Set, Home Made.  I cut a little rectangle out of cardstock for the door.  The fence is the Martha Stewart Fence punch.  Then, I added a few Recollections embellishments and some paper punch pumpkins and it was done.  It would have been finished quicker, but I was watching a scary movie at the same time!

Here are a couple of different view of my little haunted house.


The best part, it's filled with candy corn!


Supplies:
Stamps:  Papertrey Ink- Home Made
Ink:  Versafine
Paper:  Bazzill, Recollections, Bo Bunny, K & Company
Misc:  Plastic House, Cuttlebug Bubbles Embossing Folder, Recollections embellishments, pop up dots, paper punches, Martha Stewart fence punch, half orange pearl, candy corn, Scor-Tape

It's actually nice and cool today in Central Florida, down to 70 degrees, whoo hoo!  I have all of my windows open, I'm wearing long pants for the first time in 9 months, and I've finished two projects on my craft table!    Now, it's time to do some cleaning, then back to crafty time!

Thanks for stopping by,

Saturday, October 15, 2011

Halloween Test Tube Treats


Here are some test tube treat holders that I have been working on.  I was recently promoted to trainer at my full time job, so my schedule has been all messed up.  I'm hoping that it will start to calm down now, and I can get back to my regular schedule and be able to get back to my regular crafty schedule!  I'm definitely going through withdrawal!

I made five of these treat holders, unfortunately, one did photograph well and somebody (we won't mention any names, Tedy) kept sitting in the picture, so I didn't get a good shot of the fifth one.

I used the template here for the instructions.  The test tubes are from Martha Stewart.  I decorated them with a variety of papers, some paper punches, and the Quickutz Cauldron.  I added some orange Stickles o the top of the cauldrons, but I had to do this twice, as somebody (Tedy) sat on them and I had to scrape orange glitter off her butt!  At least she is festive for fall season!


Supplies:
Stamps:  Savvy Stamps:  Have A Spooky Halloween
Paper:  Martha Stewart, Debbie Mumm, Bo Bunny, Recollections, Reminisce
Ink:  Memento, Versafine
Misc:  Test tubes, candy, bat paper punch, skull paper punch, button, skittles, Cricut Plantin School Book (star) Cricut Cartridge, DMC floss, Stickles, pop up dots, ribbon

Thanks for stopping by,

Saturday, October 8, 2011

Bugs & Hisses!


I had these spider tea light holders packed in my Halloween decorations.  I decided to transform into some fun candy holders

I wrapped a strip of black cardstock around where the tea light is supposed to go, forming a tube.  The tube was stuffed with some green paper shred.  I filled a pretzel bag, half way, with some candy corn, and inserted it in the tube.  After I tied a bow around the top of the candy bag (and trimmed off the excess), I made a tag using the Bugs and Hisses stamp from Stampendous.  The little witches hat is from a  Quickutz die.

The spider's face/head was made using Nestabilities, and paper punches.


Supplies:
Stamps:  Stampendous-Bugs and Hisses
Ink:  Versafine
Paper:  Recollections, DCWV, Papertrey Ink
Misc:  Nestabilities, Witch Hat Quickutz, paper shred, pretzel bag, spider tea light holder, paper punches, pop up dots, white gel pen

Thanks for stopping by,


Thursday, October 6, 2011

Rockin' Birthday Gift Card Holder

My sister asked me to make a guitar shaped gift card holder for my nephew, Joe, who is celebrating his 17th birthday on Saturday.  When did that boy get so old?!  

So, for inspiration, I've been listening to Def Leppard, Poison, REO Speedwagon, Styx, Van Halen and all of the Monsters of Rock!  I'm not sure my neighbors have appreciated my loud singing, but in order to fully appreciated Arena Rock, you have to let it rip!


Onto the details of my project....I used the Cricut Rock Princess Cartridge to make the guitar.  It's cut at 8 1/2 inches.  I cut several layers and sandwiched them with foam tape.  I kind of messed it up a little bit and I ran out of the metallic paper, so I fudged it a little.  I'm not sure Joe will be able to tell, so it's all good.  I cut two guitar pieces  for the back and adhered them together.  The neck of the guitar is a little flimsy and this helped make it a little more durable.  A simple pocket was made using my trusty Scor-pal and adhered with some Scor-tape.  The sentiment is computer generated.


(Hold on, I'm doing my guitar solo to Panama by Van Halen....)

The front and the back are attached using a tiny brad, so the guitar front sort of swings to the side to reveal the gift card inside.  I added a little bling to totally trick my guitar out.


It's kind of hard to photograph that shiny metallic paper without getting a glare, so I took several pictures.  It looks much better in person, I'm quite pleased with the way it came out, I almost want to keep it for myself and tell Laura that I didn't have time to make it!


Supplies:
Paper:  DCWV, Colorbok, Recollections, Wasua
Cricut Cartridge:  Rock Princess
Misc:  Foam tape, Nestabilities, black rhinestone bling, silver bling, Scor-pal, Scor-tape

Thanks for stopping by,

Wednesday, October 5, 2011

No Tricks, Just Some Halloween Treats!


Today is my first day off since last Monday, ironically since my last post!  Last night, I told Oscar and Tedy that we didn't have to set the alarm, as we could sleep in.  Well, at 8:00 AM, there were little furry paws tapping me on the face!  Oh, well, at least I don't have to go anywhere today!


This is card was inspired by Becca at Amazing  Paper Grace.  She does such beautiful work.  I made a few changes, primarily using a different stamp set.  It's not as magnificent as hers, but I think it came out alright.  As a bonus, I got to use up some scraps of paper that I've had forever!

Supplies:
Stamps:  Justrite-Favorite Occasions Set
Paper:  Bazzill, K & Company, Heidi Grace Designs, Wasau
Misc:  Nestabilities, black rhinestone bling, Diamond Glaze, Copics, ribbon, pop up dots


Thanks for stopping by,

Monday, September 26, 2011

Would you like some candy?

 
This is one of my favorite Kraftin Kimmie stamps, Pick Your Poison.  I thought it would go perfect with this empty Crown bottle.  I dusted off my watercolor pencils and blender pen and colored her dress and hair.  I used Copics to color her flesh, as I like the way it looks better than with the pencils.  It has been a long time since I used the pencils, and I'm a little rusty, but I think she came out ok. 


The fence is from an old Sizzix die , the pumpkin, bat and moon are all from paper punches.  I sponged a little ink on the edges of the pumpkin and moon to give it a little dimension.  It took a little while to put all the candy corn in it, as the opening of the bottle is kind of small, so  I could only put one or two pieces in at a time.  I used some sticky strip to attach the base onto the bottle, but then used some foam tape to attach the moon, pumpkin, and my "Poisoner"!

Supplies:
Stamps:  Kraftin' Kimmie-Pick Your Poison
Ink:  Martha Stewart, Versa, Memento
Paper:  Martha Stewart, Recollections, Wasau, Bo Bunny, Bazzill
Misc:  Empty Crown Royal Bottle, candy corn, paper shred, foam tape, paper punches, Sizzix Fence die, baker's twine, ribbon, Copics, Dove Blender pen, Prismacolor Watercolor pencils, white gel pen

Thanks for stopping by,


Friday, September 23, 2011

A Few More Luggage Tags


When I bought the little suitcase  for my Dad's birthday present, I picked up a couple of smaller ones, too.  This one is for my Mom, it has an assortment of some of my handmade cards in it.


This won is for my stepfather.  He loves mini doughnuts and honey buns, so I think I will put a variety of both in his.


Supplies:
Paper:  Bo Bunny, Recollections, Cosmo Cricket, Core-indations, Debbie Mumm
Ink:  Tim Holtz-Tea Dye
Misc:  Making Memories Metal Frame, K & Company Metal Key, Quickutz Train Die, Sticko Alphabet, Martha Stewart Punches, pop up dots, Nestabilities, half pearls, Shimmer Spritz, brads

Thanks for stopping by,

Thursday, September 22, 2011

Fall Toilet Paper!


Like the donuts, I think I may be taking the toilet paper thing too far!  In my defense, I love pumpkins and scarecrows go perfectly with pumpkins, so I HAD to make a scarecrow.


It was pretty easy to make.  I just use some unbleached muslin for the base.  Then, I hot glued some raffia for the hair.  The hat is made with some designer paper that I had bought last year.  It is only single sided, so I used two pieces back to back.  It took a few practice runs before I perfected it.  The edges of the hat are inked with some Tim Holtz Tea Dyed  Distress Ink.  To make his face, I used two buttons and some paper punches.  I very CAREFULLY used a Sharpie Pen to make his mouth.


This little embellishment on his hat was made using the Button Boutique Papertrey Ink Die.  A paper punched pumpkin and a Quickutz bird completed the patch.

Supplies:
Paper:  Debbie Mumm, Cosmo Cricket, Bazzill, Recollections, We R Memory Keepers
Ink:  Tim Holtz Tea Dye
Misc:  Toilet paper, fabric, crimping tool, buttons, black Sharpie pen, ribbon, raffia, Quickutz Bird die, paper punches, pop up dots, half pearl, Papertrey Ink Button Boutique die

Thanks for stopping by,
Wednesday, September 21, 2011

Mint To Teach!


I had a few extra Altoid tins in my stash and decided to make some teacher appreciation gifts.  The sentiment is computer generated.  They are really simple to make, just a little ribbon, brad, and Nestabilities, and they are done.  I wish I could remember the name of the designer paper, but I only had a scrap of it left!  It's definitely only of my favorite papers.


Inside View

Thanks for stopping by,

Tuesday, September 20, 2011

BBTB2 Challenge-3D TBB&M


I made the little spider from a Reeses Peanut Butter Cup and some paper punches.  Using clear acetate, I cut the triangle box from the Tags, Bags, Boxes & More Cartridge.  I added a some green paper shred and made a little "nest" with candy corn and pumpkins for the spider.  The top is held closed with a bow.    I used the Justrite set, "Witch Way To The Treats" set to make the medallion for the center of the bow.  It's kind of hard to see in the picture, but I added a little orange rhinestone on the spider.


Supplies:
Stamps:  Justrite-Witch Way To The Treats
Paper:  K & Company, Recollections, Bazzill
Ink:  Versafine, CTMH
Misc:  Green paper shred, paper punches, pop up dots, white gel pen, candy, Nestabilities, orange rhinestone, ribbon, Scor-Tape,  Cricut

After I finished taking pictures of this, I turned around and this is what I found laying on my bed.  I couldn't resist taking their picture.  They are so tired, probably because they spent the night (while I was trying to sleep) running around my bedroom with out touching the floor!


Thanks for stopping by,


Friday, September 16, 2011

Pop! Pop! Fizz! Fizz!...


Good Morning!  Here is a great way let you know how much you appreciate your favorite teacher.  I printed the sentiment out on the computer.  Using the Cricut Preserves Cartridge, I cut the center of the apple out on clear acetate.  This way, I could put the clear part over my sentiment (so it's centered), traced it, and then cut it out.  It was pretty simple, except, I can't find the overlay for the Preserves Cartridge!   Dang it!  I looked in everywhere for it!  So, I had to keep referring back to the handbook to see what buttons to push.  This made it took a lot longer.   I cut each layer (except the sentiment) twice and sandwiched the layers with foam tape to give it a little extra dimension. Using my Crop-A-Dile, I punched holes on either side of the apple stem to insert the ribbon.  This holds the tag onto the bottle, and the awesome teacher can easily remove the tag ( without ripping the paper) and enjoy the refreshing beverage.


Supplies:
Paper:  Recollections, Bazzill
Misc:  Cricut Preserves Cartridge, ribbon, bottled soft drink/sparkling water, pop up dots, computer generated sentiment.

Thanks for stopping by,